SONG MODE
91
SONG EDIT
In Song Edit Mode you can view and edit individual note, controller and other MIDI
events in each track of the currently selected sequence, through three separate functions: (1)
Data Change, which lets you modify the data: (2) Data Insert, which lets you insert new
data; and (3) Graph, which lets you view notes as dots on a keyboard diagram plus a hori-
zontal line which displays dots that indicate the position of note data in the measure.
● ENTERING AND EXITING SONG EDIT MODE
To enter Song Edit Mode, press EDIT in the Mode section
on the panel, and select the various functions with the
function keys. To exit Song Edit Mode, press EXIT once or
more, or any other MODE button on the panel.
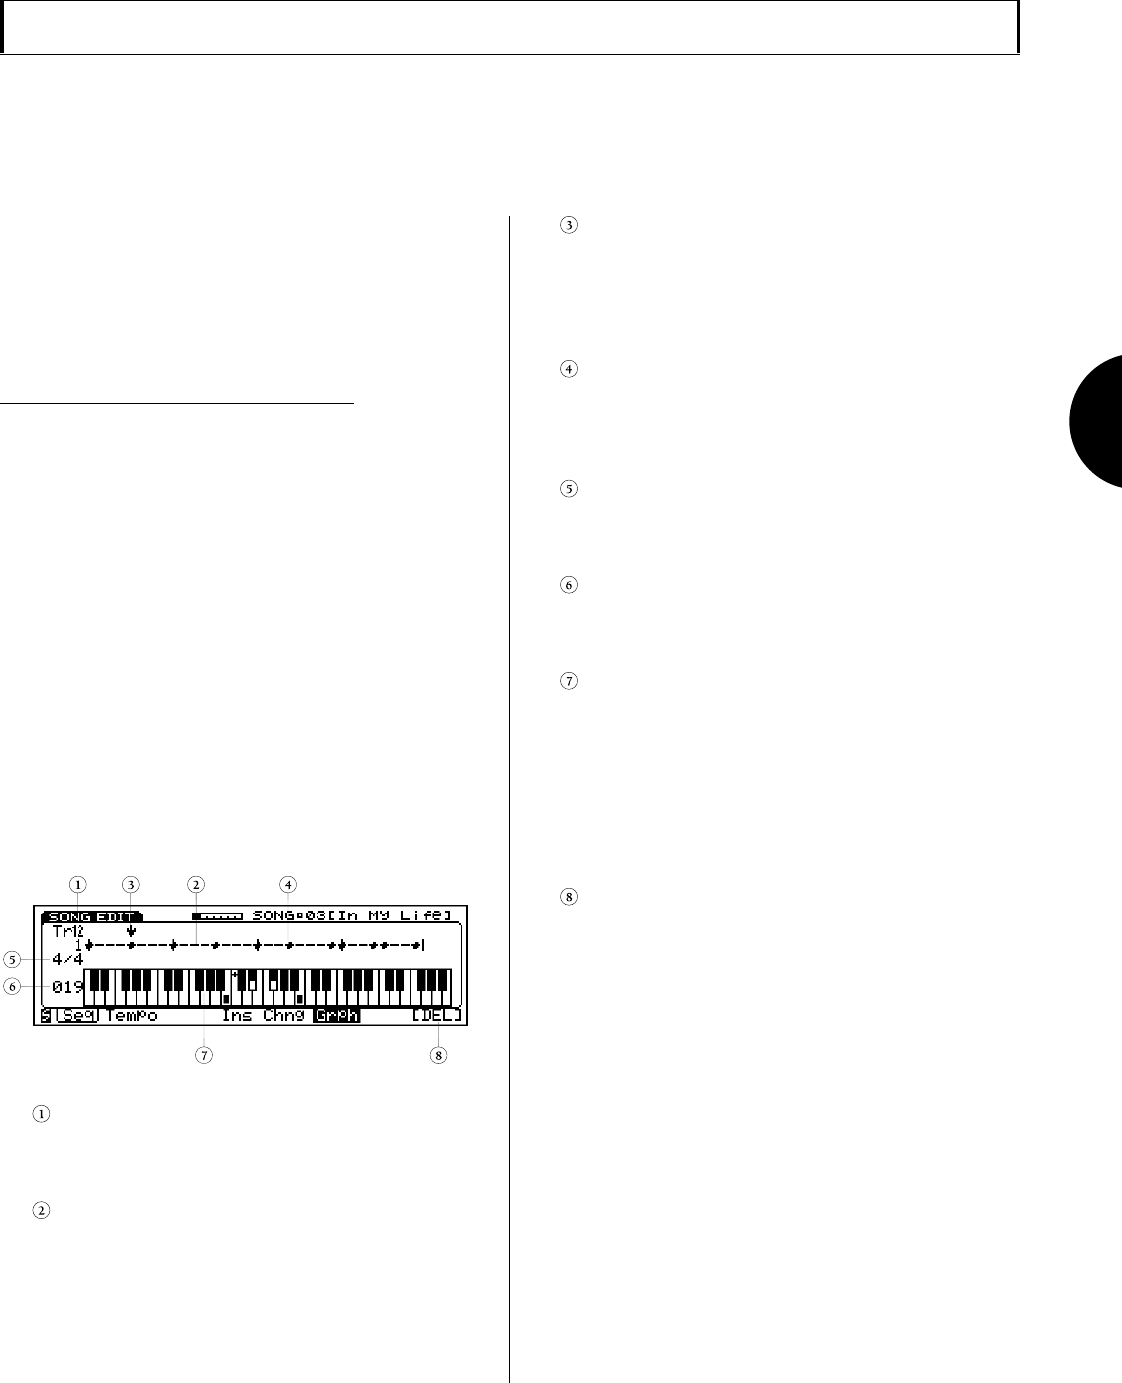
SEQUENCE TRACK GRAPH
The Sequence Track Graph function lets you view notes as
small black squares on a keyboard diagram plus a horizontal
line which displays dots that indicate the position of note data
in the measure. The Graph function lets you view the data in a
track as well as delete the data at the point where the position
pointer is located.
● MOVING AROUND THE GRAPH
Using the JOG, or SHUTTLE, or the CURSOR keys, you can
scroll back and forth through the measures in the graph and
stop wherever you like (then switch to Data Change or Data
Insert to change or insert data, respectively). As you cross
note data, it will display on the keyboard diagram and
sound by the tone generator.
● ACCESSING GRAPH
To access the Graph function, from within Song Edit Mode,
press [F6] ( Grph ). The Graph function screen will appear.
TRACK NUMBER
Indicates the currently selected track. To select a track,
press a TRACK button (1 ~ 16) on the panel.
MEASURE BAR
The horizontal line represents one measure, and the
vertical divisions each represent one beat. When data
exists, a dot will display on the bar to indicate a 32nd
note area which contains data.
POSITION POINTER
As you scroll backward or forward through the data
using the JOG, the CURSOR keys or the SHUTTLE, a
downward-pointing arrow will move in 32nd note steps
to indicate the current position in the measure.
NOTE DATA DISPLAY
If the currently selected 32nd note area contains data,
the notes in that area will display as small black squares
on the keyboard diagram.
TIME SIGNATURE
Indicates the time signature as designated before
recording.
MEASURE NUMBER
Indicates the current measure represented by the
measure bar.
KEYBOARD VIEW
The entire keyboard will not fit in the screen, but you
can access views of the lower region of the keyboard by
pressing and holding SHIFT followed by pressing [F1]
once or more, and the upper region of the keyboard by
pressing and holding SHIFT followed by pressing [F2]
once or more. A small plus + sign indicates middle C,
or C3.
DELETE
Pressing [F8] ( DEL ) lets you delete the note data at the
point where the position pointer is located. If more than
one note is in the location, all notes will be deleted.
