


GB
7
OWNER'S MANUAL
•
C4
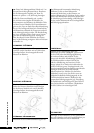
ROLLING HILLS PROGRAM
1.
Select the ROLLING HILLS program by pressing
the
ROLLING HILLS key after the meter has been
switched on or after pressing the
RESET key.
2. The various effort levels are indicated by dots
on the display. By pressing the
ROLLING HILLS key
repeatedly you get the display to show different
effort profi les (P1 - P4) and you can choose the
one best suited for you by pressing
ENTER.
3. The TIME display will start to fl ash. Choose the
desired duration of workout by using the arrow
keys (10-180 minutes in steps of 5 minutes, default
20 minutes). Press
ENTER. The equipment uses
this value to calculate the duration of the different
effort levels during the program.
4. The Total Counts display starts to fl ash. The
display reads
KG _. Enter your weight by using the
arrow keys (default value 70 kg). Press
ENTER.
5. Begin your workout.
6. You can adjust the profi le effort level with the
arrow keys (default 100 %), and the columns in
the display indicate the chosen effort level.
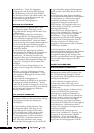
HRC INTERVAL PROGRAM
The HRC INTERVAL program enables training at
the varying, requested pulse level. The program
requires measurement of heart rate.
1. Select the HRC INTERVAL program by pressing
HRC after the meter has been switched on or after
pressing
RESET. The various target HR levels are
indicated by dots on the display. By pressing the
HRC key repeatedly you get the display to show
different profi les (P1 - P4) and you can choose the
one best suited for you by pressing
ENTER.
2. The TIME display will start to fl ash. Choose the
desired duration of workout by using the arrow
keys (10-180 minutes in steps of 5 minutes, default
20 minutes). Press
ENTER. The device uses this
value to calculate the duration of the different
effort levels during the program.
3. The Total Counts display starts to fl ash. The
display reads
KG _. Enter your weight by using the
arrow keys (default value 70 kg). Press
ENTER.
4. Begin your workout. If the pedaling effort
seems too strenuous or easy, change the
preset pulse
value (default 100 %) by using the arrow keys. The
columns in the display show the present target
HR
level.
Follow your heart rate during the training and
especially the heart indicator. The
HR light should
fl ash in time with your heartbeat. If the indicator
begins to function in a disturbing fashion (e.g.
additional beats or abnormal fl uctuations), the
pulse measurement is not functioning properly.
Stop your workout at once and make sure that you
have followed all the instructions described in this
manual about heart rate measurement.
TARGET HR PROGRAM
The TARGET HR program enables training at the
requested heart rate level. The program requires
measurement of heart rate.
1. Select the TARGET HR program by pressing
TARGET HR after the meter has been switched on or
after pressing
RESET.
2. The HR display will start to fl ash. Set the desired
heart rate value (default 110 bpm) by using the
arrow keys. Press
ENTER. NOTE! The preset value
can be changed during the training.
3. The TIME display will start to fl ash. Choose the
desired duration of workout by using the arrow
keys (10-90 minutes in steps of 5 minutes). Press
ENTER. The equipment uses this value to calculate
the duration of the different effort levels during the
program.
4. The Total Counts display starts to fl ash. The
display reads
KG _. Enter your weight using the
arrow keys (default value 70 kg). Press
ENTER.
5. Begin your workout. If the set heart rate value
seems too strenuous or easy, change the heart rate
value by using the arrow keys. The columns in the
display show the present heart rate level.
PAUSE
The values in a workout that has been interrupted
are saved in the memory of the meter for 5
minutes, after which they are
RESET. You can restart
the interrupted exercise by pedaling within 5
minutes.
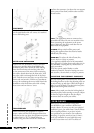
TRANSPORT AND STORAGE
Please follow these instructions when carrying
and moving the equipment about, because lifting
it incorrectly may strain your back or risk other
accidents:
NOTE! Always switch the power off and unplug
the power cord before you start moving the
equipment around!
The device is easy to move by pushing along on the
integrated transport wheels. Tilt the device from
the front and push along the fl oor on the wheels at
the front support.
To prevent the equipment malfunctioning, store in
a dry place with as little temperature variation as
possible and protected from dust.
MAINTENANCE
The equipment requires very little maintenance.
Check, however, from time-to-time that all screws
and nuts are tight.