


E-Maxx
•
19
9. Additional Maintenance: Increase your frequency of disassembly,
inspection and lubrication of the following items: This is necessary
after extended wet use or if the vehicle will not be used for an
extended period of time (such as a week or longer). This additional
maintenance is needed to prevent any trapped moisture from
corroding internal steel components.
• Stub axle housing bearings: Remove, clean, and re-oil the bearings.
• Front and rear differential: Remove,
disassemble, clean, and re-grease
the differentials. Refer to your
exploded view diagrams for help with
disassembly and reassembly.
• Transmission: Remove, disassemble,
clean, and re-grease the transmission
components. Use a light coating of
wheel bearing grease (from an auto
parts store) on the metal gear teeth.
No grease is required for the nylon gears. Refer to your exploded
view diagrams for help with disassembly and reassembly.
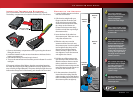
• Titan motors: Remove the motors, clean with aerosol motor
cleaner, and re-oil the bushings with lightweight motor oil. Be sure
to wear eye protection when using spray aerosol cleaners.
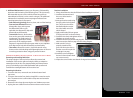
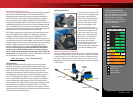
Receiver Box: Maintaining a Watertight Seal
Removing and Installing Radio Gear
The unique design of the receiver box allows the removal and
installation of the receiver without losing the ability to maintain a
watertight seal in the box. The patent-pending wire clamp feature
gives you the ability to also install aftermarket radio systems and
maintain the watertight features of the receiver box.
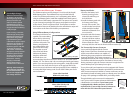
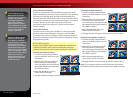
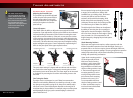
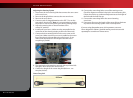
Removing the Receiver
1. To remove the cover, remove the two 3x10mm button-head
cap screws.
2. To remove the receiver from the box simply lift it out and set to the
side. The antenna wire is still inside the clamp area and cannot be
removed yet.
3. Remove the wire clamp by removing the two 2.8x8mm cap screws.
4. Unplug the servo cables from the receiver and remove the receiver.
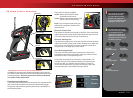
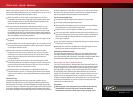
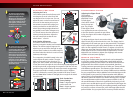
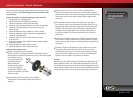
Receiver Installation
1. Always install the wires into the RX box before installing the receiver.
2. Install the antenna wire and
the servo cables into the
receiver box.
3. Arrange the wires neatly using
the wire guides in the receiver
box. The excess wire will be
bundled inside the receiver
box. Label which wire is for
which channel.
4. Apply small bead of silicone grease
(Traxxas part #1647) to the wire clamp.
5. Install the wire clamp and tighten the two
2.8x8mm cap screws securely.
6. Install the receiver into the box and plug the
wires into receiver. Refer to page 9 for the wiring diagram.
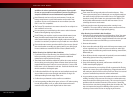
7. Make sure the O-ring is
properly seated into the
groove in the receiver box so
that the cover will not pinch it
or damage it any way.
8. Install the cover and tighten
the two 3x10mm button-head
cap screws securely.
9. Inspect the cover to make sure that the O-ring seal is not visible.
Driving Your Model