


34
TRACKER 5100/5100i/5500/5500i Installation and Operation Manual
NAVMAN
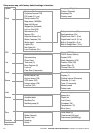
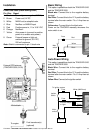
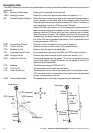
Power/data cable for display unit
Wire the cable as shown on the next page.
Note:
The unit requires 12 V DC power. This power
supply must be protected with a fuse or circuit
breaker of between 2 and 3 A. If it does not
have this, fit a 2 A fuse in the power supply line.
To enable auto power (see section 2-1),
connect the yellow Power/data cable wire to
the positive power supply as shown.
To disable auto power, leave the wire
disconnected; make sure it can not touch any
other conductor.
If the external beepers and lights require more
than 200 mA DC total, fit a relay.
For information on how to connect NavBus, refer
to the NavBus Installation and Operation manual.
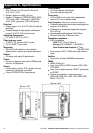
Setup and test
1 Remove the dust covers from the connectors.
2 Plug the eight way connectors into their
sockets on the back of the display unit:
Match the colour on the end of the
connector to the colour of the nut on the
socket.
Hold the plug against the socket and rotate
the plug until it slides into the socket.
Lock the plug in place by pushing the
locking collar towards the socket and
turning it a quarter turn clockwise.
Nothing will be damaged if a cable is plugged
into the wrong socket by mistake.
3 If the unit has an external GPS antenna:
Plug the gold connector into its socket on
the back of the display unit.
Hand tighten the locking collar clockwise -
do not overtighten.
4 If the display unit is bracket mounted:
i Hold the display unit in place on the
mounting bracket shaft, with the rubber
washer clamped between the bracket and
the display unit.
ii Adjust the tilt and rotation of the display unit
for best viewing and hand tighten the knob.
5 Remove the dust cover. Turn the TRACKER on
(see section 2-1).
6 Insert any required C-MAP™ chart card (see
section 1-2).
7 When the TRACKER is turned on for the first
time, the TRACKER displays an installation
menu of setup data:
i Select the language to use.
ii Change the setup data if necessary:
Select the data item to change.
Use the cursor keys to change the data.
Press ENT.
iii When the setup data is correct, press
ESC.
These installation options can be changed
later, through the setup menu (see section 13).
8 At the satellite display, check that it picks up
GPS satellites. Wait for the GPS receiver to
start up and the fix type to change from
‘Acquiring’ to ‘GPS fix’. This should take less
than two minutes (see section 7).
9 If the TRACKER is to send NMEA data to an
autopilot, set this up (see section 13-8).
10 If the TRACKER is part of a NavBus system,
set the backlight group. Otherwise turn NavBus
off (see section 13-8).
11 Go on a test run to check that the navigation
equipment works correctly, particularly when a
radio transmitter or radar is used.