


22
TRACKER 5100/5100i/5500/5500i Installation and Operation Manual
NAVMAN
Warning: After creating or changing a route,
display the route on the chart and check that it
does not cross land or dangerous water.
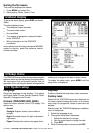
10-2-1 Creating a new route
A. Creating a new route from the chart display
While creating the route:
Press or to change the range; scroll the
chart by moving the cursor to the edge of the
chart.
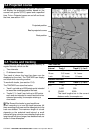
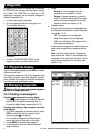
A data box at the top, left of the display shows
the route name and total distance. If the cursor
is near a leg, it shows the length and bearing
of the leg as well.
The legs of a route must start and end at
waypoints. If a leg does not start or end at an
existing waypoint then a new waypoint will be
created automatically (to change the new
waypoint data, see section 9-2-7).
1 In the chart display, press MENU and select
New route.
2 The route is given a default name:
i Change the name if necessary.
ii Select Ok.
3 To enter the first leg of the route:
i Move the cursor to the start of the route
and press ENT.
ii Move the cursor to the end of the first leg
and press ENT.
4 To add a waypoint at the end of the route:
i Press ENT.
ii Move the cursor to where the new route
waypoint will be.
iii Press ENT.
5 To insert a waypoint in the route:
i Move the cursor to the chosen leg to insert
the waypoint.
ii Press MENU and select Insert.
iii Move the cursor to where the new route
waypoint will be.
iv Press ENT.
6 To move a waypoint in the route:
i Move the cursor to the waypoint to move.
ii Press MENU and select Move.
iii Move the cursor to where the waypoint will be.
iv Press ENT.
7 To remove a waypoint from the route:
i Move the cursor to the waypoint to remove
from the route.
ii Press MENU and select Remove. The
waypoint is removed from the route, but the
waypoint is not deleted.
8 Repeat this process until the route is finished.
Review the route and check that the route does
not cross land or dangerous water.
Then press ESC.
Or, to delete the route that is being created:
i Press MENU and select Delete.
ii Select Yes to confirm.
Tip: The distance and bearing calculator can also
be used to enter a course and save it as a route (see
section 3-2).
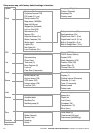
10 Routes
10-2 Managing routes
A route is a list of waypoints that the boat can navigate
along. Routes can be created, changed and deleted.
The TRACKER can have up to 25 routes. Each route
can have up to 50 waypoints. A route can:
Start and stop at the same waypoint .
Include waypoints more than once.
The TRACKER can navigate along a route in either
direction. Waypoints on the route can be skipped.
Routes are a powerful feature when the TRACKER
is connected to an autopilot, allowing the vessel to
be automatically guided along the route.
Warning: Make sure that routes do not cross
land or dangerous water.
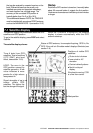
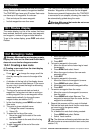
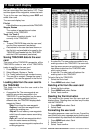
10-1 Routes display
The routes display is a list of the routes that have
been entered, each with route name, start waypoint,
end waypoint, number of legs and total distance.
To go to the routes display, press DISP and select
Routes.