


299
Controls in detail
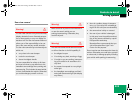
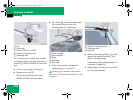
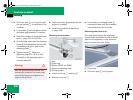
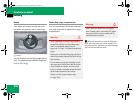
Loading
̈ Place rear crossbar 7 on roof rails a
in such a way that the clamping claws
reach into gaps 8 (
୴ page 298) on the
roof rails.
̈ Make sure clamping claw 5 lies flush
against the inside of roof rail a as
shown in the illustration (
୴ page 298).
If necessary, adjust clamping width of
crossbars (
୴ page 299).
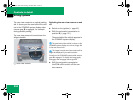
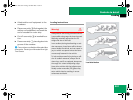
̈ Slightly tighten screw 4 on both sides
by turning it clockwise.
̈ On the front and rear crossbars tighten
screws 4. Observe a tightening
torque of 4 lb-ft (6 Nm).
̈ Attach cover caps (୴ page 298) and
lock them.
̈ Store key and Allen wrench back into
the storage well (
୴ page 490).
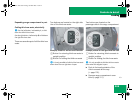
Adjusting the clamping widths of the
crossbars
The clamping widths of the crossbars are
factory set for your vehicle. These clamp-
ing widths are solely intended for the des-
ignated positions.
Only install the crossbars at the designat-
ed locations and pay attention to the
stickers 3 FRONT and REAR
(
୴ page 298).
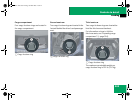
4 Screw for clamping claw
5 Clamping claw
b Screws for adjusting clamping width
(2 in total for each side)
c Cover strip
Warning! G
Have the tightening torque checked after
mounting the crossbars. The screws could
come loose if they are not tightened to a
torque of 4 lb-ft (6 Nm).
Warning! G
Only install the crossbars at the exact loca-
tions designated on the roof rails. The desig-
nated locations for the front crossbars are
between the markings engraved on the in-
side of the roof rails (
୴ page 298). The des-
ignated locations for the rear crossbars are
between the gaps on the roof rails
(
୴ page 298).
Otherwise, the crossbars (୴ page 298),
mounted accessories and the objects at-
tached to them could come loose from the
vehicle causing an accident, thereby injuring
you and other persons and/or causing dam-
age to property, including damage to your
vehicle.
୴୴
164.boo Seite 299 Freitag, 30. März 2007 12:54 12