


11
13
ASSEMBLY
F
L1114pr-0920
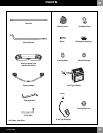
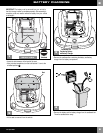
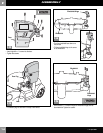
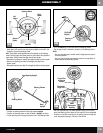
• Turn the vehicle on its side.
• Fit a lock washer, rounded side up, into the
assembly tool. Make sure it fits completely
inside the assembly tool.
• Fit the assembly tool (with lock washer in it) onto the end of the
rear axle.
• Tap the assembly tool with a hammer to secure the lock washer on
the end of the rear axle.
• Pull on the lock washer to be sure it is secure on the rear axle.
Rear
Axle
Assembly Tool with
Lock Washer Inside
10
BOTTOM VIEW
Assembly Tool
Lock Washer
Rounded Side UP
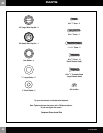
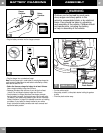
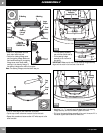
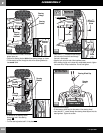
• Turn the vehicle upright (or keep on its side).
• Insert one of the tabs on the hubcap cover into a slot in the hubcap.
• Then, push with your fingernail (or carefully with a slotted
screwdriver), the other two hubcap cover tabs into the slots
in the hubcap.
• Repeat this procedure to assemble another hubcap cover to the
other hubcap.
Hubcap
Hubcap
Cover
Tab
Tab
Tab
Slots
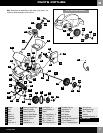
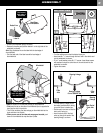
9
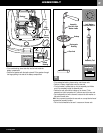
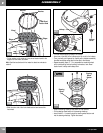
• Fit another wheel (with a round bushing inserted) onto the end of the
rear axle. Make sure the outside of the wheel (smooth side) faces out
and the ribs on the inside of the wheel fit in the grooves in the driver.
• Fit a rectangular bushing, base side out, onto the rear axle.
• Push the rectangular bushing so that it fits into the rectangular
opening in the wheel.
• Fit a hubcap to the outside of the wheel. Make sure the peg on the
hubcap fits into the small hole in the outside of the wheel.
Outside of Wheel
Rectangular
Bushing
Driver
Grooves
Peg
Small
Hole
Hubcap
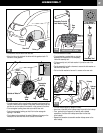
8
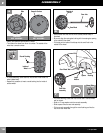
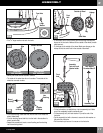
• Fit the driver onto the end of the rear axle.
• Align the ribs on the inside of the driver with the gearbox teeth. Fit
the driver to the gearbox.
Rear Axle
Driver
Gearbox
Teeth
Base
Base