


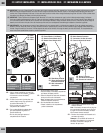

e Large Hole
in Dashboard
f Grand trou du
tableau
de bord
S Orificio
grande en
el tablero
e Bend Up
f Coude VERS
LE HAUT
S Doblez para
ARRIBA
7
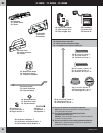
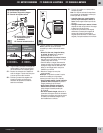
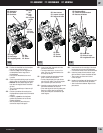
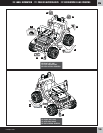
e • Fit the steering cap into the centre of the
steering wheel. Be sure to align the notch
in the steering wheel cap with the tab in
the centre of the steering wheel.
• Insert two #8 x 2,5 cm (1") screws into the
steering wheel cap. Tighten the screws.
f • Placer la garniture du volant au centre de
celui-ci. Aligner l’encoche située sur le côté
de la garniture du volant sur la patte située
au centre du volant.
• Insérer deux vis no 8 de 2,5 cm dans la
garniture du volant. Serrer les vis.
S • Ajustar la tapa del manubrio en el centro del
manubrio. Alinear la muesca de la tapa del
manubrio con la lengüeta del centro
del manubrio.
• Introducir dos tornillos No. 8 x 2,5 cm en
la tapa del manubrio y en el manubrio.
e Steering Wheel
f Volant
S Manubrio
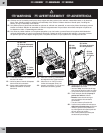
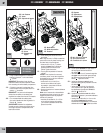
e • Insert the steering column (with steering
wheel) into the large hole in the dashboard.
Make sure the large opening in the steering
wheel and the bend in the steering column
are UP.
f • Insérer la colonne de direction (avec le
volant) dans le grand trou du tableau de bord.
S’assurer que la grande ouverture du volant
et la courbe de la colonne de direction sont
SUR LE DESSUS.
S • Introducir la columna de mando (con el
manubrio) en el orificio grande del tablero.
Cerciorarse de que el orificio grande en el
manubrio y el doblez de la columna de
mando apunten para ARRIBA.
8
e Large Opening UP
f Grande ouverture
VERS LE HAUT
S Orificio grande
para ARRIBA
e Steering
Column
f Colonne de
direction
S Columna de
mando
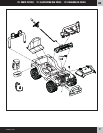
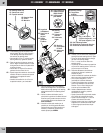
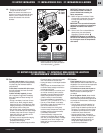
1,1 cm
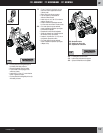
e • Carefully, turn the vehicle over, keeping the
steering wheel and steering column in place.
• Fit the end of the steering column through
the hole in the steering linkage.
• Fit a 1,1 cm cap nut on the end of the
steering column.
• Tap the cap nut with a hammer to attach the
cap nut on the steering column. Pull on the
cap nut to be sure it is secure.
f • Retourner délicatement le véhicule en
maintenant le volant et la colonne de
direction en place.
• Insérer l’extrémité de la colonne de direction
dans le trou de la tringlerie de direction.
• Fixer un écrou borgne de 1,1 cm à
l’extrémité de la colonne de direction.
• Frapper l’écrou borgne avec un marteau
pour le fixer solidement à la colonne de
direction. Tirer sur l’écrou borgne pour
s’assurer qu’il est solidement fixé.
S • Voltear cuidadosamente el vehículo,
manteniendo el manubrio y columna
de mando en su lugar.
• Ajustar el extremo de la columna de mando
en el orificio de la conexión de mando.
• Ajustar una tuerca ciega de 1,1 cm en el
extremo de la columna de mando.
• Golpear la tuerca ciega con un martillo para
asegurarla en la columna de mando. Jalar
la tuerca ciega para cerciorarse de que
está segura.
e End of Steering Column
f Extrémité de la colonne de direction
S Extremo de la columna de mando
9
e Steering Linkage
f Tringlerie de
direction
S Conexión de mando
e Steering Wheel Cap
f Garniture du volant
S Tapa del manubrio
e 1,1 cm Cap Nut
f Écrou borgne de 1,1 cm
S Tuerca ciega de 1,1 cm
14
e ASSEMBLY f ASSEMBLAGE S MONTAJE
F
H4436pr-0720