


MAN 650067:F
4
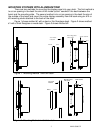
Method #1
Cut a rectangular hole where you want the dash mounted that is 1-11/16” tall x 17” long.
Next round the ends to match the bezel. The hole should be 18-11/16” long in the center from
end to end.
Remove the six screws that secure the mounting plate to the display panel. Next remove
the eight screws which attach the bezel to the mounting plate.
For thin dash material, place several strips of foam tape on the front of the mounting
plate. These will be compressed down when it is mounted to the dash.
Place the lens and bezel into the opening in your dash. Place the mounting plate up from
behind the dash and secure it to the bezel using the eight pan head screws. The screws with go
through the lens and thread into the bezel. Do not over tighten these screws. Just tighten them
so that the bezel is held in place securely.
Next attach the display system to the mounting plate using the six screws. Make sure
that the display panel is aligned properly with the flat gray cable coming out on the top side.
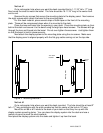
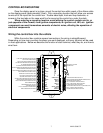
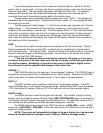
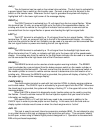
Your dash
material.
Mounting studs
Assembled Display Panel
Nut for
stud
Figure 3. Mounting Method 2.
Method #2
Cut a rectangular hole where you want the dash mounted. The hole should be at least 2”
tall x 17” long rectangular with the ends rounded so that the center of the hole is 19” long.
Mount the six #8 or #10 studs to the back of your dash so that they line up with the
display system mounting holes. You can place the display system into the dash and use a
marker or pencil to mark the stud locations.
Next place the display system onto the studs and tighten it up from the back.