


7
BEFORE YOU BEGIN CONT.
PRECAUTIONS
This system will add remote keyless entry features to any vehicle
with power door locks. This will also work as a replacement
system for the factory installed keyless entry system.
Use masking tape to indicate the preferred mounting locations
of interior components, LED and override switch.
Disconnect the dome light fuse until you are ready to plug the
unit in.
DO NOT use mechanical wiring connections, such as crimp or
snap together taps. Follow instructions on pages 2-3.
DO NOT disconnect the battery if the vehicle has an anti-theft-
coded radio or is equipped with an airbag. Doing so may cause
a warning light to be displayed and may require a trip to the
dealer to be corrected.
DO NOT leave the interior or exterior lights on for an extended
period of time as it may cause battery drain.
DO NOT mount the control module until all connections have
been made and tested. Using wire ties or double sided tape,
MOUNT THE MODULE UNDER THE DASH.
technology and components. It is computer controlled and
manufactured in the U.S.A. The dependability and variety of
features make Bulldog Security the leader in the industry. Enjoy
your new system for years to come!
Since there are many different makes and models of vehicles,
look at the wiring chart on our website,
www.bulldogsecurity.com/wires.htm.
Read this manual thoroughly before starting the installation.
8
When testing for a positive or negative voltage, you must use a
computer friendly test light (logic probe) or a volt/ohm meter. Make
sure to probe and test each wire before making your connections.
TESTING YOUR WIRES
PRECAUTIONS CONT.
DO NOT plug the harnesses into the control module until all
connections have been made. Be careful to line up the pins on
the unit with the wiring harness plug (lip up - Red wire to the
right). Failure to do this will cause severe damage to the unit
and possibly to the vehicle.
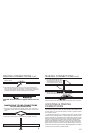
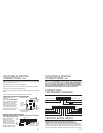
MAKING CONNECTIONS
1. Strip back two inches of insulation on the wire from the remote
starter.
2. Strip back one inch of insulation on the wire you need to connect to.
3. Separate the vehicle wire as shown. Make the separation large
enough to fit the other wire through.
4. Insert the wire(s) from the starter through the hole as shown. if two
or more wires are inserted, wrap them in opposite directions.
TTwo Inches of Bare Wirewo Inches of Bare Wire
One Inch of Bare WireOne Inch of Bare Wire
NOTE:If it is necessary to cut a factory wire to make a connection,
see diagram on page 8.