


24
HOW TO USE YOUR
REMOTE TRANSMITTER CONT.
VALET MODE
To activate Valet Mode, first disarm the system. Hold Button #4 for ten (10)
seconds and the system will chirp once. Press Button #4 again within two (2)
seconds and the system will chirp once again. The LED will remain on when
in valet mode. To deactivate the valet mode, repeat the above steps, however,
the system will chirp twice when Button #4 is pressed the second time.
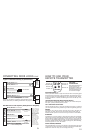
LED STATUS INDICATOR
LED STATUS VIOLATED ZONE
Armed LED flashes slowly External Sensors 3 Flashes
Disarmed LED off Door Switches 5 Flashes
Passive Arming Flashing fast Ignition 6 Flashes
Valet ON
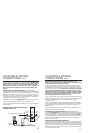
OVERRIDE SWITCH
If the remote control is lost, this switch allows you to disarm your system.
First open the door and turn the ignition ON, then press the override switch.
SHOCK SENSOR
To activate the Shock Sensor, disarm the system, then press Button #4 for
ten (10) seconds. The system will chirp once. Press Button #2 within two (2)
seconds and the system will chirp once again. To deactivate the shock sensor,
repeat the steps above, except the system will chirp twice after Button #2
is pressed.
LOCK/UNLOCK WITH IGNITION
To activate locking and unlocking with the ignition, disarm the system, then
press Button #3 for ten (10) seconds. The system will chirp once. Press Button
#2 within two (2) seconds, and the system will chirp once. To deactivate this
feature, repeat the steps above, except the system will chirp twice after Button
#2 is pressed. When this feature is active, the system will lock the doors five
(5) seconds after the ignition is turned on. The system will unlock the doors
immediately when the ignition is turned off.
DOOR LOCK PULSE
The Door Lock Pulse length choices are 0.7 seconds and 3.5 seconds. To
program the 3.5 second pulse length, press Button #3 for ten (10) seconds
and the system will chirp once. Press Button #1 within two (2) seconds and
the system will chirp once again. To program the 0.7 second pulse length,
repeat the above steps, except there will be two (2) chirps after pressing
Button #1.
23
HOW TO USE YOUR
REMOTE TRANSMITTER CONT.
PASSIVE ARMING
To activate Passive Arming, disarm the system, then hold Button #3 for ten
(10) seconds. The system will chirp once. Press Button #3 again within two
(2) seconds. The system will chirp once to indicate that passive arming is now
programmed. To deactivate passive arming, hold Button #3 for ten seconds
until one chirp occurs. Press Button #3 again and two (2) chirps will occur,
indicating that all passive arming functions are disabled.
If passive arming is programmed, the system will automatically arm itself 60
seconds after the ignition is turned off.
If the ignition is turned on or the door is opened, the passive arm countdown
period begins and remains reset until the ignition is turned off and the door
closed. If the ignition is turned on then off, the passive arming remains reset
and the LED off until a door is opened and closed. Chirps will occur 30 seconds
before the passive arming activates.
SHOCK LOCK
If passive arming without door locking is programmed, the doors will
automatically lock when a shock violation occurs. They will remain
locked until 60 seconds after the violation has ended. The doors will
then automatically unlock.
HIGH THEFT
To activate the High Theft feature, press Button #2 within 2 seconds after
arming. The system will chirp once (or flash if silent arming is active) indicating
the acceptance of this feature.
If high theft is programmed, the system will emit one chirp every 30 seconds
while armed.
SHOCK DISABLE
To shut the shock sensor off for this arming period, press Button #1 again
after arming and one (1) chirp (or flash) will occur.
REMOTE CAR STARTER (Negative Out #1 on Pin 10 of the Harness)
Press Button #2 while the system is armed or disarmed, the parking lights
will light, and the connected accessory will be activated. As long as Button
#2 is pressed, a ground signal is applied to the accessory and the parking
lights will stay on. To use for remote start, it may be connected to output 1
or 2. However, the unit must be disarmed (doors unlocked) before remote
starting. After the car is running, the doors can be relocked.