


Installation Guide
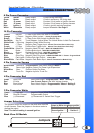
QUICK START INSTALL
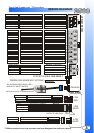
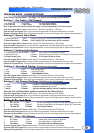
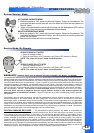
Yellow Starter Output Connect To The Vehicles Starter Wire.
Green Heater Output Connect To The Vehicles Accessory Wire.
Red 12 power Input Connect to Constant 12 Volt Power Source- High Current.
Red 12 power Input Connect to Constant 12 Volt Power Source- High Current.
Blue Ignition 1 Output Connect To the Vehicles Primary Ignition.
White Selectable Output Select Jumper Position (If Necessary). See Page 5.
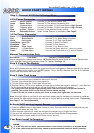
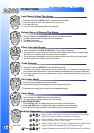
6 Pin Power Connector
14 Pin Power Connector
Manual Transmissions Only
Step 2- Plug-In The Module
Step 3- Auto Tach Learn
Your Basic Install Is Complete!
Step 1 - Connect All Of the Following Wires
Black/White Park Brake Connect (-) Parking Brake
Manual transmission vehicles must have a “M” Series Remote Starter Installed. Manual Transmission
Units Must Be Placed Into Reservation Mode To Operate. See Page 10.
Your Basic Installation is Now Complete!!
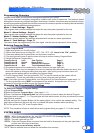
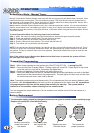
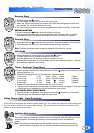
1) Make all the required wire connections and plug-in the Unit.
**The park lights should flash twice upon power up.
2) Turn the Ignition Key ON. (Park Lights will turn on).
3) Start the vehicle, LED’s on the antenna will come on to confirm tach signal is detected**, then after two
to ten seconds the park lights will turn off then flash twice to confirm tach learning.
* The system will flash the park lights seven times if not tach learned and the start button is
pressed. The system must be tach learned before remote starting.
** If the LED’s do not come on during tach learn, a proper tach signal was not detected.
Note: If the park lights do not flash in auto tach learn mode it may be necessary to connect to a different
tach source. For best results connect the tach wire to the coil pack or to a fuel injector wire. If necessary
See Page 11. for Tach Adjustment.
NOTES:
1) If the unit does not start, check the starter is not in Tach Lock Out or in Program Mode.
2) If the vehicle still does not start, check all connections and check for factory security.
When all the connections are done, the control module can be plugged in. Before connecting the control
module, make sure the ignition is in the OFF position. Plug in the 6 pin harness then the 14 pin followed
by any other connectors that were used.
6
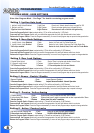
Black System Ground Connect To Chassis Ground.
Pink Brake Switch Connect To (+) When Brake is Applied.
White Park Lights Connect To (+) Park Light System.
Green/White Hood Pin Connect To Hood Pin Switch.
Blue/White Tach Connect To Tach Source.
White/Blue Siren / Horn Connect To (+) Siren or Horn.
Green or (-) Door Input Connect the Green wire to a (-) door pin system.
Purple (+) Door Input Connect the Purple wire to a (+) door pin system.
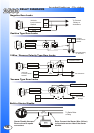
Activate Self Learning Impact Sensor
1) Press the LOCK button on the remote 5 times in a row. The siren should chirp 3 times and the park
lights should come and stay ON.
2) While the park lights are on, strike the vehicle at the desired level to trigger the alarm.
3) The siren will respond with one chirp to confirm that the Shock Sensor is programmed.
4) Press the lock or unlock button to exit Shock Sensor learning.