


18-EN
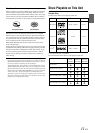
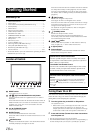
Accessory List
• X008U/INE-W957HD............................................................1
• Power cable.........................................................................1
• Flush head screw (M5×8) (INE-W957HD only) ...................6
• Screw (M5×8) ......................................................................8
• GPS Antenna .......................................................................1
• Antenna mounting plate ......................................................1
• Cable clamp for antenna................................................1set
• AUX/PRE OUT cable ...........................................................1
• CAMERA/W.REMOTE cable ................................................1
• USB extension cable ...........................................................1
• Microphone..........................................................................1
• SD memory card..................................................................1
• Cushion (X008U only)..........................................................1
• Mounting sleeve (INE-W957HD only)..................................1
• Face plate (INE-W957HD only) ...........................................1
• Bracket key (INE-W957HD only) .........................................2
• Owner’s Manual..............................................................1set
• To install the X008U, refer to the manual in the separately purchased
installation kit for each car type.
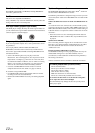
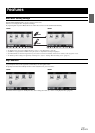
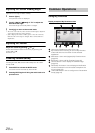
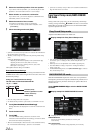
Location of Controls
RESET switch
The system of this unit is reset.
/ (My Favorites/iDataLink mode) button
The My Favorites screen for registered User1 or User2 is
displayed.
Press and hold this button for at least 3 seconds to switch to
iDataLink mode. You can check the car’s status, set the air
condition, etc,. when this unit is connected to the car’s
iDataLink module box.
/ (DOWN/UP) button
Press to adjust the volume.
MUTE/C button
Press to activate/deactivate the mute mode.
Press and hold this button for at least 3 seconds to turn the
power off.
/AUDIO button
Displays the Audio/Visual screen. If the Audio/Visual screen
is already displayed, changes the source.
Press and hold this button for at least 3 seconds to activate
the “Easy Sound Setup” mode (page 24). You can select
this menu to be displayed on the left or right of the screen.
For details, refer to “Setting the Easy Sound Setup Position”
(page 55).
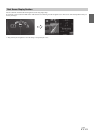
(MAP) button
Recalls the navigation map screen.
Press again to switch to Navigation menu screen.
Press and hold this button for at least 3 seconds to change
to Go Home route screen. If the Home is not set yet, it will
change to Home setting screen.
For details of navigation operations, refer to “Navigation
System OM” in the CD-ROM.
(PHONE) button
Recalls the Telephone Menu screen.
When a hands-free phone with Voice Recognition is
connected, press and hold for at least 3 seconds to switch
to the Voice Recognition mode.
/ button
Press to seek down/up station in radio mode or down/up
track, chapter, etc., in other audio/visual source.
c (Eject) button
Remote Sensor
Point the remote control transmitter towards the remote
sensor within a range of 2 meters.
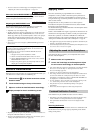
Turning Power On or Off
Some of this unit’s functions cannot be performed while the vehicle is in
motion. Be sure to stop your vehicle in a safe location and apply the
parking brake, before attempting these operations.
1
Turn the ignition key to the ACC or ON position.
The system turns on.
• When turned on, the system displays the last mode screen that
was displayed before the ignition key was turned off. For
example, if the unit is in radio mode when ignition is turned off,
it will remain in radio mode when ignition is turned back on.
2
Press and hold the C button for at least 3 seconds to
turn the power off.
• The unit can be turned on by pressing any button.
• The X008U/INE-W957HD is a precision device. Careful handling of
the unit should provide you with years of trouble-free operation.
Getting Started
• The illustration is for X008U.
Optional Remote Control Interface Box
This unit is operable using the vehicle’s secondary radio controls.
An Alpine Remote Control Interface Box (optional) is required. For
details, contact your Alpine dealer.
Controllable with Remote Control
This unit can be controlled with an optional Alpine remote control.
For details, consult your Alpine dealer. Point the optional remote
control transmitter at the remote control sensor.
About the button descriptions used in this Owner’s
Manual
The buttons found on the face of the unit are expressed in
bold (e.g. (My Favorites)). The buttons found on the
touch-screen display are shown in bold within brackets, [ ]
(e.g. []).