2-2 Installation and Operation 5707070-A
Advanced Energy
®
TOOLS REQUIRED FOR INSTALLATION
• Sandpaper to clean the pipe surface to bare pipe
• Tape measure to measure pipe size
Pre-installation Procedures and Checks
Before you install your Doppler flow meter, there is a pre-install check you should
perform to ensure that this is the appropriate meter to use for your application. If you
encounter any difficulties during the pre-installation procedures, see “Determining if
Your Process/Installation is Right for a Doppler Flow Meter” on page 2-3 before
proceeding with the installation process.
To Perform the Doppler flow meter Pre-installation Check:
1. Mount the transducers side by side between 7 o’clock and 10 o’clock on the pipe
(see “Mounting and Connecting the Transducers” on page 2-9 for more
information).
2. If not already connected, connect the transducers to the electronics enclosure (see
“Mounting and Connecting the Transducers” on page 2-9).
3. Connect AC or DC power to the flow meter (see “Mounting and Connecting
Power to the Electronics Enclosure” on page 2-13).
4. Turn on the power using the switch on the display panel.
5. After the electronics enclosure powers up and the front display panel lights up,
press soft key 1 to select FPS (feet per second).
6. Estimate your expected flow rate and compare it to the reading in feet per second
on the display panel.
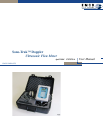
Table 2-1. Items shipped with the flow meter system
Fixed unit (C5F model) Portable unit (C5P model)
• Electronics enclosure
• Two transducers and a 25´ cable
(standard); custom lengths up to
5000´ are available
• Digitizer
•Tiedown kit
• Sonic coupling gel
•User manual
• Electronics enclosure
• Two transducers and a 25´ cable
(standard); custom lengths up to
5000´ are available
• Digitizer
•Tiedown kit
• Sonic coupling gel
•User manual
• 12 V 2.2 AH battery
• 110 VAC battery charger
• Tote handles and side latch
• Field transport case