


6)
7)
or sealed lead-acid batteries, where you can unscrew the lid of the battery and are able to top it up with
water. The maximum boost voltage for this type of batteries is 14.8V.
Some modern batteries have had calcium added to their plates in order to reduce water loss in the battery.
The down side with this is that you need a high charge voltage to get the batteries charged. This setting goes
up as far as 15.1 volts on boost and can have a detrimental effect on voltage-senstive equipment on the
boat/vehicle.
8)
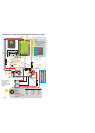
Simply connect the enclosed temperature sensor to a battery terminal post
and to the to the small terminals marked “battery temp”. Insert one wire into each side of the connector, there is no
polarity on these wires. Make sure you do not crush the temperature sensor which is a small thing inside the ring terminal,
as this will destroy the processor chip. The output voltage will be reduced in accordance with the manufacturer’s battery
charging temperature curves and in the eventof the battery temperature increasing due to battery failure (thus exceeding
50 deg C), the unit will switch off. The bat to bat will operate without this being connected and will default to 20 deg c
As standard this unit senses all the control voltages at the unit’s input and output terminals.
However, if you want to sense the voltage directly at the domestic battery to overcome a voltage drop in the cable run,
then simply connect a cable from the “Remote Sense” connector directly to the domestic battery. This will increase the
unit’s voltage output by up to 1.5 volts to compensate for the cable voltage drop. (For safety reasons this is software-
limited, because if this function was allowed to run up too far, it could melt cables if they were not of the correct
specification for the job.)
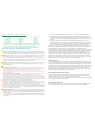
An optional extra for the battery-to-battery charger is the remote control kit. It comes complete
with a remote display. See fig 5-6 for remote operation.
When the unit is connected, it senses the output voltage from the input battery. If the voltage is above 11 volts, the system
will come on for about 3 minutes. It will then work out that the input battery is too low to do anything and shut its self
down into sleep mode. The only way to start the system then is to increase the input battery voltage by either starting the
engine or switch on a battery charger. When the unit first starts up,all the l.e.d.s will come on one at a time to see if they
work ok. then the batterytype LED should come on depending on the battery type selected, and the constant current
negative
Open Lead-Acid
Calcium-Calcium (liquid lead-acid):
De-sulphation Setting:
Battery Temperature Sensing
Remote Voltage Sensing
Remote Control Kit
Start up and test procedure
:
:
:
Boost 14.8V, Time1-8hrs, Float 13.3V
Boost 15.1V, Time1-6hrs, Float 13.6V
Boost 15.5V, Time 4 hrs, Float none/off.
It is important to ensure that your equipment works safely at a voltage in the region of 15.4
volts (x2 for 24V systems) before selecting this option, most equipment does but not all.
WARNING:This is a very dangerous setting if used without understanding what it does. First of all,
the batteries should be isolated from the boat’s system as the voltage will be pushed up close to 16
volts which will damage some onboard equipment. The reason why you would engage this charge
mode is to blast the sulfation off old or unused batteries to regenerate them. It will probably need to be
used on an old set of batteries which are not charging or holding a charge.This program will help a lot
to remove the sulfation from the plates. It is unlikely this setting would need to be used when the
batteries are still new. Do not use this setting on sealed, gel orAGM batteries as they will gas and you
will be unable to replace the water loss!
Fuses : Because the instructions refer to 12V as well as 24V units between 100 and 200 amps and there
are a lot of different fuse possibilities and combinations, it is simply not possible for us to recommend any
fuse values. This will be up to the installer. However, here are a few key issues to remember when choosing
a fuse:
1) In most cases a fuse is there to protect the cable not the product, so always fuse 50% plus on the product
rating. For example, if the product is a 50 amp charger, use a 75 amp+ fuse.
2) Too small a fuse in an alternator line can cause major problems. If, for example, you have a 90 amp
alternator and you only put a 90 amp fuse on, then on start up and when cold, a 90 amp alternator can
produce about 120 amps. This will blow the fuse and because you have open circuited the alternator, this
will result in the destruction of the alternator. So it is vital that an alternator cannot blow its fuse normal
operating paramters as this will be an expensive mistake. Always fuse high, i.e. on a 90 amp alternator use a
150 - 200 amp fuse.
OTHER FEATURES
24
23
222222222222222222222222222222222222222222
8
6
7
13
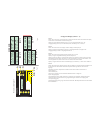
Gelb: offene Säurebatterie
Leuchtet auf, wenn die Temperatur der Lichtmaschine 90 Grad Celcius übersteigt. Folge ist, dass in einen
Standby Modus geschaltet wird und die Batterieladung unterbrochen und eingestellt wird, bis die Lima
wieder bis auf 75 Grad Celcius abgekühlt und die LED erloschen ist.
Blinkt mit Beginn der Batterieaufladung in den ersten 3 Minuten und leuchtet anschliessend konstant.Alle
20 Min. blinkt diese wieder für 3 Minuten (auto-pause-modus).
Leuchtet auf, wenn die Ladeschlussspannung erreicht wurde und in denAusgleichsladungsmodus geschaltet
wurde. DieAusgleichsladungszeit beträgt zwischen 1Std. - 24 Std. (abhängig vom Batterietyp und dem
Ladezustand bei Beginn der Ladung).
Diese bleibt als einziges leuchten, wenn die Haupt- und Ausgleichsladung abgeschlossen ist. Das System
läuft nun auf Erhaltungsladung.
Dieses warnt den Benutzer und schaltet das Gerät. Das bedeutet, dass der Regler der Lichtmaschine oder ein
anderes Ladesystem versagt hat und mit zu hoher Spannung lädt. Die Starter-Batterie wird durch diese
überspannung zerstört.
Nehmen Sie diese Warnung sehr ernst und stoppen Sie den Motor so schnell wie möglich. Entfernen Sie das
Ladekabel, führen Sie Ihre Reise fort und reparieren Sie die Lichtmaschine.
Die Spannung am Eingang ist zu niedrig. Entweder ist die Lichtmaschine oder andere Ladeeinheit oder die
Batterie defekt. Das Gerät schaltet den Ladevorgang nicht ein.
Information: meistens deutet dies auf eine defekte Lichtmaschine hin.
Das Gerät schaltet sofort ab, um einen Schaden zu verhindern. Entweder ist die Regelung im Gerät defekt,
oder eine andere Ladeeinheit erzeugt eine zu hohe Spannung.
Die Spannung amAusgang ist zu gering. Entweder steht nicht genügend Spannung am Eingang zur
Verfügung oder die zu ladende Batterie ist defekt oder das Gerät ist defekt und lädt nicht.
Die Temperatur der zu ladenden Batterie beträgt mehr als 50°C. Das Gerät hat abschaltet, um einen Schaden
zu verhindern. Entweder ist die Batterie defekt oder gesamte Raum, wo die Batterie steht ist wärmer als
50°C. Sollten Sie trotzdem weiterladen wollen (entgegen jeder Empfehlung), dann müssen Sie den
Temperatursensor entfernen.
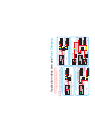
LED 15 = überhitzung der Lichtmaschine (gelb)
LED 16 - Haupladung (grün)
LED 17 - Timer (Ausgleichsladung) (gelb)
LED 18 - Erhaltungsladung (grün)
LED 19 - überspannung am Eingang (rot)
LED 20 - Unterspannung am Eingang (gelb)
LED 21- Spannung amAusgang überhöht (rot)
LED 22 - Unterspannung amAusgang (gelb)
LED 23 - Erhöhte Temperaturder Batterie (rot)
LED 24 - überhöhte Gehäusetemperatur (gelb)
Wir können nichts dagegen tun, ausserSie zu warnen!