


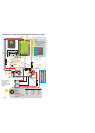


schieben Sie dieAbdeckkappen (A) über die Schrauben.
Entfernen Sie dieAbdeckkappen (A). Schneiden Sie einen Ausschnitt von 134x90mm in Ihr Panel. Das
sollte eigentlich von einem Laser gemacht werden, um eine absolut gerade Kante zu bekommen. Das Panel
sollte eine maximale Stärke von 3mm aufweisen. Bei mehr als 3mm steht die Fernbedienung zurück, was
vielleicht optisch nicht optimal aussieht.Anschließend benötigen Sie 4 Bohrlöcher mit Senkungen zur
Befestigung des Gerätes.Als Schrauben dienen die 4 bereits vorhandenen Schrauben mit Senkkopf.
Dementsprechend müssen auch die Bohrungen und Senken im Panel gearbeitet werden. Nach Beendigung
dieserArbeiten entfernen Sie die 4 Schrauben, schieben das Gerät von hinten in den Ausschnitt und
befestigen es anschließend mit diesen 4 Schrauben. Fertig.
Verlegen Sie das Kabel nicht neben Leitungen die 230Vführen, als auch nicht neben Leitungen, die hohe
Ströme leiten. Durch die Nähe kann es zu Störungen der Daten kommen. Die Verbindung ist eine reine
Datenverbindung, die mit sehr geringen Spannungen arbeitet.
Wir empfehlen Ihnen dieses Kabel NICHT zu kürzen. Im Falle einer Auftrennung undWiederverbindung
des Kabels übernehmen wir keine Verantwortung im Falle eines Kontaktproblems. Das müssen Sie selber
entscheiden.
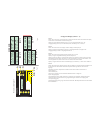
Verbinden Sie das mitgelieferte Kabel mit der Fernbedienung.Auf der Rückseite der Fernbedienung ist ein
Loch hinter dem sich der Steckersockel befindet.Achten Sie bei der Verbindung auf die korrekte Richtung.
Der kleine Klipp auf dem Stecker muss nach oben zeigen.
Verbinden Sie nun den anderen Stecker mit demAnschluss auf dem Ladegerät.Achten Sie auch hier auf die
korrekte Richtung des Steckers.
Durch Drücken der Taste kann die Hintergrundbeleuchtung einschaltet als auch wieder
ausgeschaltet werden.
DasAlarm kann mit der Taste ein- und ausgeschaltet werden.
Nach dem Einschalten des Ladegerätes (TASTE "A") kommt eine Mitteilung des Herstellers.
Anschließend wird Ihnen die Softwareversion des Gerätes als auch die Softwareversion der Fernbedienung
angezeigt. (nur Software ab Version 2).
Das Gerät kann jederzeit über die Taste "A" ein- und ausgeschaltet werden. Haben Sie das Gerät einmal
ausgeschaltet, wird es bei einem Neustart des Motors NICHT wieder von alleine einschalten.
DerAuto-Pause-Modus lässt sich ein und ausschalten. Bei jedem Neustart des Gerätes ist der Auto-Pause-
Modus automatisch eingeschaltet, um der Starterbatterie eine Ladung zu gewährleisten. DieAuto-Pause sind
die ersten 5 Minuten und dann alle 20 Minuten für 3 Minuten. Genau diese Funktion lässt sich deaktivieren.
Zum Ein- undAusschalten des dieser Funktion müssen die Tasten 1 und 2 gleichzeitig gedrückt werden, bis
ein Signalton ertönt.Anschließend erscheint eine Meldung im Display.
Als Hinterbaugerät im Schaltpanel:
Verlegen des Kabels:
Anschluss des Gerätes:
Hintergrundbeleuchtung
LIGHT
Alarm Geräusch
ALARM
Einschalten des Gerätes:
Auto - Pause - Modus:
BATTERY-TO-BATTERY CHARGER
INSTRUCTIONS
Thank you for purchasing the Sterling Battery-to-Battery Charger, a sophisticated product which will help you to fast and
effectively charge a second battery on board of your boat or vehicle.
The Sterling Battery-to-Battery Charger is a technically highly advanced charging device which enables you to fast and
effectively charge a second battery from your existing on-board DC electrical system. Sterling Batttery-to-Battery
Chargers are available in different versions which vary in power, input voltage and output voltage. These instruction
generally refer to a system voltage of 12V DC on the input as well as on the output side. If your own unit uses a different
system voltage on either the input or the output side (for example 24V or 36V), then simply multiply the given voltages by
2 or 3 respectively.
Before starting to install the unit, please read and
understand these instructions completely, in order to avoid any possible safety risks and to avoid any danger of
damaging the unit or your boat / vehicle.
Important: The voltages mentioned in these instructions always referto a 12V-to-12V battery-to-
battery charger. If you have a 24V-to-24V unit, multiply all voltages by 2. If you have a 36V-to-36V
unit, multiply all voltages by 3 etc etc
MULTIBLE UNITS CAN BE USEDAT THE SAME TIME
SAFETY
General Safety Precautions
The Sterling Battery-to-Battery Charger has to be installed in a location that is protected from rain, snow, mist, smoke,
water and grid salt.Also, the bilge is not a suitable place for installation. Do not cover the fans! Do not install the charger
in a room without ventilation; otherwise the unit will overheat and under perform. The unit has a high 40 deg c ambient
temperature rating and so can deal with high ambient heat, but the cooler the better.
In order to avoid the risk of fire and electrical shock make sure that all your cables are in good and approved condition and
that the cable sizes being used answer the purpose. Do not use the charger with damaged or unsuitable cables!
This equipment includes components which may cause arcs or sparks on installation. In order to avoid fire or explosion do
not install the unit in a room which contains batteries or highly inflammable materials or in a location that requires
ignition protected equipment. This includes any space containing gasoline-powered machinery, fuel tanks or joints, fittings
or other connections between components of the fuel system.
If battery acid contacts skin or clothing, wash immediately with soap and water. If acid enters the eye(s), immediately
flood eye(s) with running cold water for at least 20 minutes and seek medical attention immediately.
Never smoke or allow a spark or a flame in the vicinity of a battery or an engine.
Be extra cautious not to drop a metal tool onto a battery. It may spark or short-circuit the battery or other electrical parts
that may cause an explosion.
Remove all personal metal items such as rings, bracelets, necklaces, watches and jewellery when working near a battery. A
battery can produce a short circuit powerful enough to weld a ring or any metal, causing serious burns.
Make sure the area around the charger has been well ventilated before you connect the charger. Do not charge the batteries
at least 4 hours prior to the installation to avoid the formation of explosive battery gases.
By now it is widely understood that the best way to charge a battery is to use 4-step charging technology which, however,
cannot be achieved from a standard alternator. The result is that with such a standard system you will charge your
domestic or auxiliary batteries neither fast nor to their full capacity. The Sterling Battery-to-Battery charger was developed
and designed to improve this unsatisfactory charging situation on many boats or vehicles.
The Sterling Battery-to-Battery Charger, in its standard application, is simply installed between a standard engine battery
(input) and a domestic battery (output). It will fool the alternator into working at its maximum ability in order to ensure all
its surplus power is utilised to charge the auxiliary battery bank to its maximum capacity without allowing the starter
battery to go flat..
The system is designed to use only the surplus power. It ensures at all times that the power required to run the primary
system, i.e. the vehicle system or the boat engine is not affected. Only the surplus power is boosted and converted into a
higher voltage which is then used to charge a secondary battery bank on a digitally controlled programable 4 step charge
Precautions against Gas Explosions
Precautions when Working with Batteries
if in doute use a proffesional
MAIN PRODUCT FEATURES