


characteristic. The starter battery cannot be discharged through this system, even in the event of the unit failing.
The Sterling Battery-to-Battery Charger will charge your extra battery bank about 5 times faster and will put about 50%
extra power into them compared to conventional charging technology. It will also increase the life of you batteries by de-
sulphating them. The charger can be programmed for all major types of batteries, i.e. open or sealed lead-acid batteries,
gel andAGM batteries, all of which will be charged with their recommended charge characteristics.
Other features included in this system are two temperature sensors (one for the alternator, one for the battery), a
connection for a remote battery voltage sensor and a fully automatic sleep sensor, which switches the unit off when the
engine has stopped.Aremote panel is available as an optional extra.
Please note that in order for the unit to work it is not necessary to use or install any of the available optional extra
features. Even with the most simple basic installation the unit will charge your batteries properly.
Fast and easy installation. Simply connect the unit to your starter battery and your domestic battery. Job done.
No extra connections to the alternator and no extra wiring for a split charge system required.
Battery banks are insulated. Engine starter battery is always well maintained.
Several battery-to-battery chargers can be used in parallel for higher output power or multiple battery banks.
No voltage rise on the alternator or the starter battery, thus no problems with the engine management system.
No warranty issues as the alternator and the main electrical system remains untouched.
The Sterling Battery-to-Battery Charger constantly monitors the engine start battery. When the starter battery voltage
exceeds about 13 volts (which is usually the case when it is being charged) the charger will activate itself. It will then start
its charging operation during which the starter battery voltage will be pulled down to no less than 13 volts. This enables
the engine battery to still receive sufficient charge and ensures that the alternator works at its full potential.
The unit takes the 13 volts from the starter battery into the control box and boosts it up to a maximum of 14.8 volts
(depending on what battery type has been selected) at the output. This will charge the secondary bank of batteries fast and
up to their full capacity. The charger then automatically calculates the optimum absorption time and keeps the voltage at
absorption level until the batteries are fully charged.After that the system will maintain the batteries at a lower float
voltage, while always ensuring that the engine battery has priority.
Install the charger like any other high power battery charger. It can be mounted in any way or direction. Do not install the
unit on carpeted, upholstered, vinyl or varnished surfaces.
Fit it as close to the primary (starter) batteries as possible in a cool, dry and well ventilated space.As with most ideal
conditions on a boat, the cool well ventilated part is a bit of wishful thinking; with this in mind you may notice that the
unit comes with a heat sink and three cooling fans. These are temperature-controlled fans and only run if required. It is
strongly recommended to fit the unit outside the engine room. However, if there is no other way and you have to install
the charger in a hot engine room, try to fit it low down on the bulkhead as it will be a little cooler there than at the top of
the engine room.
ProductAdvantages
How it works
i
i
i
i
i
i
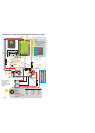
INSTALLATION (see Fig. 8)
Install the unit as per wiring diagram. Ensure that the cables being used have the correct rating and
size for the power being applied. Fit in a cool, dry and well ventilated place.
Warning: If the unit is working and you adjust the rotary switch while the unit is on, then the
adjustment will not take effect or be shown on the l.e.d.s until the unit shuts down and restarts (to
allow the change in the internal software code )
REMOVE OR DISCONNECT ANY ORIGINALSPLIT CHARGE DIODE OR SPLIT
CHARGE RELAYSYSTEMALREADY INSTALLED INTHE MOTOR HOME OR
BOATAS THIS WILLCAUSE ACONFLICT WITHTHE NEW STERLING CHARGING
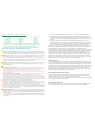
1) Select the battery type you require from the list below and printed on the lable. Carefully adjust the rotary
switch . Ensure on start-up the correct L.E.D. comes on which should confirm your battery type
selection.
121212121212121212121212121212121212121212
Installations- und Bedienungsanleitung
FERNBEDIENUNG FÜR BATTERIE-zu-BATTERIE-LADEGERÄT
Wir danken Ihnen zu dem Kauf unserer Fernbedienung. Wir haben viel Zeit und Mühe investiert, um
möglichst viele Funktionen zu verwirklichen.
Fernbedienung /Anzeige inkl. Aufbaurahmen.
Kabel (ca. 8 Meter)
Stichsäge (bei Einbaumontage)
12mm Bohrer (beiAufbaumontage
2mm Bohrer
4 Stk. 45x3mm Senkkopfschrauben
Kreuz-Schraubenzieher
Lieferumfang:
Benötigte Werkzeuge und Teile:
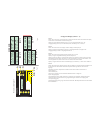
Ort der Inbetriebnahme
inneren
Installieren Sie den Batterie-Management-Controller an einem trockenen Ort. Wählen Sie diesen Ort so,
dass Sie jederzeit dieAnzeige ablesen können und auch die Schalter bedienen können.
=> ORT MUSS TROCKEN SEIN!!
Der Installationsort muss leicht zugänglich sein!
Nun müssen Sie sich entscheiden,ob Sie das Gerät alsAufbau- Einbau- oder Hinterbaugerät verwenden
wollen.
Bohren Sie ein Loch für das Kabel in die Rückwand.Anschießend markieren Sie die Bohrlöcher für die
Befestigungsschrauben. Dazu schieben Sie die rechte und linkeAbdeckkappe (A) seitlich vom Gerät ab.
Bitte keine Gewalt anwenden, da diese aus Kunstoff bestehen und die Führungsrillen brechen können. Nach
demAbschieben können Sie die Befestigungslöcher sehen. Markieren Sie die Bohrlöcher mit den
mitgelieferten Schrauben. Verbinden Sie die rückseitigen Anschlüsse mit den Kabeln und befestigen Sie
anschließend das Gerät mit den gelieferten Schrauben.
Entfernen Sie dieAufbauverblendung (B) von dem Gerät durch Abziehen nach hinten.
DieseAufbauverblendung (B) können Sie nun sehr einfach als Einbauschablone benutzen. Halten Sie die
Einbauschablone an den gewünschten Einbauort. Jetzt zeichnen Sie mit einem Bleistift den
Ausschnitt nach.
Sägen Sie denAusschnitt sehr vorsichtig und genau, denn dieAbdeckung der Kante ist nicht sehr breit.
Anschließend verbinden Sie das Kabel mit dem Gerät und dann schieben Sie das Gerät in die von Ihnen
gesägte Öffnung und schrauben es mit 4 kurzen Schrauben mit Senkkopf fest.Achten Sie darauf, dass die
Schrauben versenkt sind, denn sonst passt dieAbeckkappe (A) nicht über die Schrauben. Anschließend
AlsAufbaugerät:
Als Einbaugerät: