


Das Gerät ist überhitzt und hat sich auf stand-by geschaltet, bis die Gehäusetemperatur wieder abgesunken
ist.
Das Gerät hat einen Hardware- ode Softwarefehler. Sollte diese LED ständig aufleuchten, muss das Gerät
zur Reparatur eingeschickt werden.
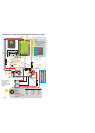
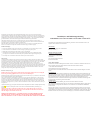
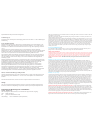
Diese Installation ist sehr einfach und eigentlich auch die gängigste. Sie brauchen den Eingang des Gerätes
nur an die Starterbatterie anzuschliessen und denAusgang mit der Service-Batterie (oder einer anderen zu
ladenden Batterie). Die Spannung der Starterbatterie liegt im Durschschnitt zwischen 13 und 14 Volt
während des Ladevorganges, die zu ladende Batterie erreicht dann eine Spannung von ca. 14.1 - 14.8V, je
nach eingestelltem Batterietyp.
LED 25 - Geräteausfall (rot)
FIG 1:
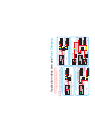
Einbauvorschläge:
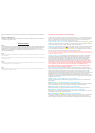
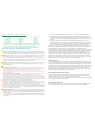
FIG 2:
FIG 3:
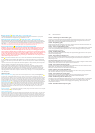
Fig4:
Bei diesem Einbauvorschlag soll eine weitere Batteriebank (z.B. Bugstrahlruder oder Ankerwinsch - Batterien) verstärkt geladen werden. Eine Trenndioden-
Ladesystem besteht bereits.
Bei dieser Option muss darauf geachtet werden, dass die Ladeschlussspannung an der Starterbatterie > 13V beträgt. Der Einsatz eines Hochleistungsreglers auf
der Lichtmaschine ist sinnvoll.
Diese Anordnung ist auf einigen Yachten zu finden. Dabei werden zusätzliche Batteriebänke über die Starterbatterie und von der Lichtmaschine geladen. Es
ist ohne Probleme möglich auch 2 dieser Gerät parallel zu betreiben.
Diese Einbauart gibt die Möglichkeit die Lichtmaschinen zusätzlicher Generatoren auch zur Ladung von weiteren Batteriebänken zu nutzen. Dadurchsteht
erheblich mehr Ladeleistung insgesamt zur Verfügung.
SYSTEMAND COULD DRAIN YOUR BATTERIES.
Please note the battery type selection should only be adjusted when the unit is off, because if the unit is on a
battery type adjustment would not be recognise by the software until the unit is switched off and on again for
the software changes to take effect.
. If you are not sure
which setting to use, then always err on the side of caution. So if in doubt, use the settings with the
lower boost voltage settings. This will not cause a problem, however the higher setting could, if used on
the wrong battery type.You can always knock it up a setting later on if you find the correct
information you require. It is no big deal picking a setting to low, but it is a big deal picking one to
high as this could permanently damage your batteries
It is best to fit the unit outside the engine room . The unit has remote battery sensing to allow it to be fitted close to the
starter battery and compensate for any voltage drop to the other battery bank. In the event of the other battery bank being
within 1-1.5 metres then the remote sensing would not be a big issue, however in the event of something like a bow
thruster battery being say 6 metres away, then the remote sensing would be a must.
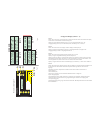
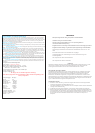
Go to the battery type program rotary switch on the unit and set
the battery type accordingly. There are 9 Settings on this switch, 7 battery types, a de-sulphation setting and
a factory setup setting. read on for the battery types to be explained in more detail.
hichever setting you use, the appropriate l.e.d. on the from of the label will light
up. Please note that the battery type L.E.D.s have 2 functions.: On starting up the system the “battery
type” selected will flash for about 10 secs. After 30 secs the 8 L.E.D.s change there function and become a
crude bar amp metre to show the approximate current going through the system.
American gel manufactures want a different charging regime than the European ones. If in doubt ask the
battery supplier.
W
1)
2)
3)
4)
5)
Program the battery type into the unit:
Selecting your battery type:
Battery Charging Terminology: Boost
float
time.
Battery Type Setting.
Gel U.S. spec.
AGM U.S. spec. Boost 14.35V, Time 1 - 8 hrs, Float 13.35V
Sealed Lead-Acid Boost14.4V, Time1-12hrs, Float 13.6V
European Gel / Exide spec.
European AGM spec.
Unfortunately, with modern batteries this is not as simple as it first appears.
The standard open lead-acid and sealed batteries are pretty straight forward. However, gel and AGM
batteries are not. Different suppliers are recommending different voltages and there does not appear to be
consistent information on these battery types. Sterling offers a selection of different settings based on
extensive contact with the manufacturers and suppliers. These do vary a lot, so it is best to contact your
battery supplier or look up your battery on the internet to know the setting you require
We use the word , also called absorption or equalising charge, to
describe the first stage of the charge cycle.All it means is that the charger is offering the boost voltage to the
batteries (and the batteries will absorb all the current up to the max current of the charger) for as long as
possible. Then the current will taper off.After a period of time the voltage will drop to . This is a
voltage which will maintain your batteries and also allows the system to act as a power pack to supply power
being used on the boat or vehicle without touching the newly charged batteries.The time on boost is
determined by the state of charge of the battery bank and the ratio of your battery bank size and the size of
the charger. The internal software program works this out every time the charger is used and will vary within
the parameters shown as
This is the setting which mostAmerican AGM battery manufacturers would like.Ask your battery supplier
for the correct setting as this is a new battery type which is becoming more and more popular.
ealed lead-acid batteries are simply lead-acid batteries which have no access to top up the water level.
This program is, as per the recommendation of Exide, set at a voltage of 14.4 volts for about 12-24 hrs. The
unit then drops to float voltage to maintain the batteries.
This is what the EuropeanAGM suppliers such as Optima want for their batteries. Again we would strongly
recommend you contact your battery supplier to confirm which charging option they require for their
batteries. This higher voltage appears to be forAGM batteries with a higher calcium content on the plates.
S
Boost 14.0V, Time1-10hrs, Float 13.7V
Boost 14.4V, Time 12 - 24 hrs, Float 13.8V
Boost 14.6V, Time 1 - 8 hrs, Float 13.7V
7
12
555555555555555555555
29
28
27
26
25