


Northstar M121/M84 Installation and Operation Manual30
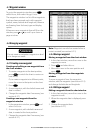
1 In the chart window, press
MENU
and select
New route.
2 The route is given a default name:
i Change the name if necessary.
ii Select OK.
3 To enter the legs of the route:
i Move the cursor to the start of the route
and press
ENTER
.
ii A waypoint is created with a default
name. To save this waypoint press
ENTER
,
to edit the waypoint refer to 6-2-3
iii Press
ENTER
a dotted leg line is displayed
from the cursor to the previous waypoint
iv Move the cursor to the end of the first leg
and press
ENTER
.
v Repeat i to iv until the last waypoint in
the route is placed and saved
vi Press
ESC
to complete the route
Menu options while creating a route:
1 To add a waypoint to the route
i Press
MENU
and select Add.
2 To insert a waypoint in the route by breaking
one leg into two:
i Move the cursor to the leg you want to
break.
ii Press
MENU
and select Insert.
iii Move the cursor to where the new route
waypoint will be.
iv Press
ENTER
.
3 To move a waypoint in the route:
i Move the cursor to the waypoint to
move.
ii Press
MENU
and select Move.
iii Move the cursor to where the waypoint
will be.
iv Press
ENTER
.
4 To remove a waypoint from the route:
i Move the cursor to the waypoint to
remove from the route.
ii Press
MENU
and select Remove. The
waypoint is removed from the route, but
the waypoint is not deleted.
5 To start navigating the route
i Press
MENU
and select Start
6 To end creating the route
i Press
MENU
and select End
7 To delete the route
i Press
MENU
and select Delete
ii Select yes to confirm.
Tip: The distance and bearing calculator can
also be used to enter a course and save it as a
route (see section 3-3).
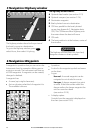
B. Creating a new route from the routes
window
1 In the routes window, press
MENU
and select
Create.
2 A new route, with a default name and no
waypoints, is displayed.
3 To change the route name:
i Select the route name at the top of the
window and press
ENTER
.
ii Change the name if necessary.
iii Press
ENTER
.
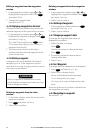
4 To insert a waypoint in the route:
i Select where the waypoint will be:
To insert the first waypoint in a new
route, select Leg 1.
To insert a waypoint at the end of
the route, select the unused leg at
the end of the list of waypoints.
Otherwise, select the waypoint to
insert the new waypoint in front of.
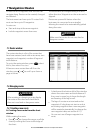
ii Press
ENTER
. A list of waypoints is
displayed. Select the waypoint to use.
As waypoints are inserted, the distance
and bearing of each leg is shown
automatically. If the route has more
waypoints than will fit on the window,
press
or to see them.