


Please Give Part No., Description and Unit Serial No.
HIGHWAY EQUIPMENT COMPANY
41
97373-A
Page Rev. B
LUBRICATION & MAINTENANCE CONTINUED
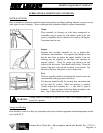
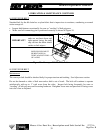
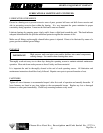
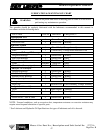
PROBLEM 2: (Figure 12)
Belt contacts one side at front and contacts other side at rear.
SOLUTION:
If adjusting as in Problem 1 does not remedy the situation, adjustment of the drive pulley is necessary.
Mark the position of the adjustment screw (RH side) on the side of the unit. Determine which
illustration shows the problem to figure out which direction the drive shaft should be moved. Loosen
the adjustment screw to move the shaft forward; tighten the screw to move the shaft rearward.
NOTE: The illustration is exaggerated. Only move the adjustment screw 1/4 turn at a time after
loosening the bolts holding the bearing. Usually, 1/64 to 1/32 inch adjustment is all that is necessary.
Retighten bearing. Operate conveyor for 10 to 15 minutes at a high speed to allow belt to react to
adjustment. The problem should change to Problem 1. Adjust as in Problem 1 to track belt properly.
Figure 12
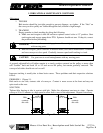
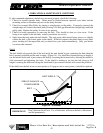
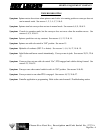
PROBLEM 3: (Figure 13)
Belt contacts side as in Problem 1, but contacts more heavily at a point approximately three feet from
rear.
SOLUTION:
Realign snubber pulley. Note the point or side of contact from the illustration. This side of the
snubber is too low. NOTE: This pulley moves up and down ONLY.
Loosen belt and raise or lower as necessary. Loosen the two bolts holding the snubber bearing on the
side to be adjusted after marking the old position. Move approximately 1/16 inch at a time and
retighten. Retighten belt the exact number of turns previously loosened. Operate conveyor 10 to 15
minutes to allow belt to react to adjustment. Refer to Problem 1 and readjust. If readjustment does not
compensate, repeat.
Belt contacts
this side, but
most firmly at
this point
Belt contacts
this side, but
most firmly at
this point
Snubber higher
on this side
Figure 13
Belt contacts
here
Belt
contacts
here
Belt
contacts
here