


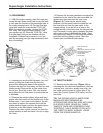
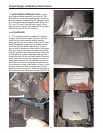
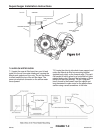
Keep the hose ends above the radiator cap
level to prevent leakage. Release the throttle
cable from the throttle shaft spool. Release the
Throttle Position Switch harness by lifting the
small wire clip that runs around the rectangular
base of the connector. If the throttle body gasket
tears as you remove it, you will need to clean
off the old gasket from both surfaces, the throt-
tle body and the intake manifold. Carefully use a
knife or the backside of a hacksaw blade to
scrape the mounting surfaces clean. DO NOT
SCRATCH OR MAR THE MOUNTING SUR-
FACES IN ANY WAY.
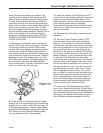
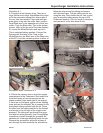
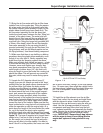
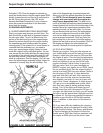
2.2 Moving to a worktable, remove the idle air
control (ICS) valve from the bottom of the throt-
tle body by removing the three Phillips head
screws. Use a good quality screwdriver and be
careful not to strip the Phillips head screws. If
you cannot loosen a screw with the screwdriver,
use a small set of pliers from the side. Carefully
separate the two units making sure not to tear
the rubber gland gasket. The rubber gland gas-
ket will want to stay with the Mazda throttle
body carefully pick it out with a flat blade screw-
driver and save it for the next step.
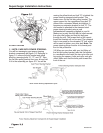
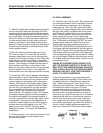
2.3 Take the Idle Air Manifold (dummy throttle
body) from your supercharger kit and install the
Mazda idle air control valve (ICS) from step 2.2
in the appropriate place. Use the rubber gland
gasket from the Mazda throttle body in this posi-
tion. Reuse the three Mazda Phillips screws.
Use no sealant, just the rubber gasket.
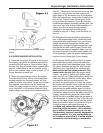
2.4 Install the Dummy Throttle Body and ICS
valve back onto the intake manifold in the same
position as the standard throttle body on the
intake manifold. Use the 1104 sealant provided
if the original gasket was not salvaged.
Reconnect the coolant hoses to the idle control
valve as you found them. Use hardware sup-
plied as necessary.
2.5 Reconnect the idle control valve electrical
connector.
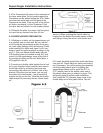
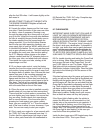
2.6 Take the Throttle Position Switch (TPS)
extension wire (3 conductor with sheathing)
from your kit and use it to extend your factory
TPS harness. We have provided six heat shrink
butt crimp connectors to use for each wire junc-
tion you will first have to cut the three pin con-
nector off of the end of the Mazda TPS harness.
Cut at least 3 inches back from the end of the
plastic connector to give yourself enough room
to work with. Our extender has three color-
coded wires that match the colors of the Mazda
harness. Strip a small section from each wire’s
end on the harness extender and connect it to
the appropriate color wire. Use the heat shrink
butt connectors to secure each splice. Crimp
with an appropriate tool or pliers. Use a heat
gun or similar to shrink the butt connector’s pro-
tective tubing over the crimped connector. We
do not recommend the use of open flame to
shrink the tubing. Wrap the entire grouping of
three connectors with electrical tape at both
ends to protect from moisture and dirt.
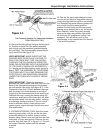
2.7 Locate the ICS blanking plate and take it
over to your Mazda throttle body. You will use a
thin layer of sealant between the blanking plate
and the Mazda throttle body. Install this blanking
plate onto your Mazda throttle body using the
three Phillips head screws supplied in the kit.
Supercharger Installation Instructions
999-156 -3- Revised 1/07