


SKU 40597 For technical questions, please call 1-800-444-3353. PAGE 6
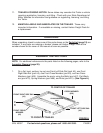
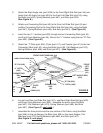
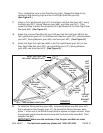
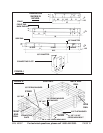
3. Attach one Connecting Rail (part #2) to the Front Left Side Rail (part #3) and
another Connecting Rail to the Front Right Side Rail (part #4), using the Bolts
(part #47), Spring Washers (part #66), and Nuts (part #61). (See Figure B.)
4. Insert the two “L” Latches (part #29) through the two Connecting Rails (part #2)
and Front Cross Member (part #5). Secure the “L” Latches using the two “R” Pins
(part #30). (See Figure B.)
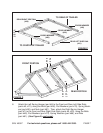
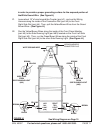
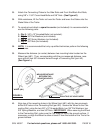
6. Lay out
one
Rear Left Side Rail (part #21),
one
Rear Right Side Rail (part #22),
and
three
Cross Members (part #20). Assemble the parts, using the Bolts
(part #47), Flat Washers (part #70), Spring Washers (part #66), and Nuts
(part #61). (See Figure C, next page.)
“T” PLATE
(#24)
CHAIN (#11)
CONNECTING
RAIL
(#2)
CONNECTING
RAIL
(#2)
COUPLER
(#1)
“L” LATCH (#29)
“R” PIN (#30)
“L” LATCH
(#29)
“R” PIN (#30)
RIGHT ANGLE IRON (#23A)
LEFT ANGLE IRON
(#23)
47
61
66
70
48
61
66
70
52
62
67
47
61
66
FIGURE B
2. Attach the Right Angle Iron (part #23A) to the Front Right Side Rail (part #4) and
attach the Left Angle Iron (part #23) to the Front Left Side Rail (part #3), using
the Bolts (part #52), Spring Washers (part #67), and Nuts (part #62).
(See Figure B.)
5. Attach the “T” Plate (part #24), Chain (part #11), and Coupler (part #1) to the two
Connecting Rails (part #2), using the Bolts (part #48), Flat Washers (part #70),
Spring Washers (part #66), and Nuts (part #61). (See Figure B.)
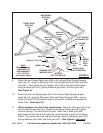
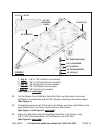
7. Assemble the front portion and the rear portion of the Trailer, using the Bolts
(part #48) on the
top
flanges, the Bolts (part #85) on the
lower
flanges, Flat
Washers (part #70), Spring Washers (part #66), and Nuts (part #61).
(See Figure D, next page.)
FRONT CROSS
MEMBER (#5)
FRONT
LEFT
SIDE
RAIL
(#3)
FRONT RIGHT SIDE RAIL (#4)