


SKU 40597 For technical questions, please call 1-800-444-3353. PAGE 10
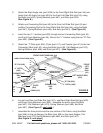
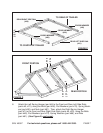
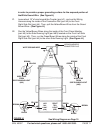
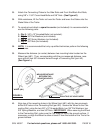
17. Attach a Tail Light Bracket (part #31) to the Rear Left Side Rail (part #21), using
the Bolts (part #47), Spring Washers (part #66), and Nuts (part #61). Then,
repeat this Step to attach the remaining Tail Light Bracket to the Rear Right Side
Rail (part #22). (See Figure G.)
18. Attach the License Plate Bracket (part #32) and Left Tail Light (part #80) to the
Tail Light Bracket (part #31) on the Rear Left Side Rail (part #21), using the Bolts
(part #47), Spring Washers (part #66), and Nuts (part #61). (See Figure G.)
19. Attach the Right Tail Light (part #82) to the Tail Light Bracket (part #31) on the
Rear Right Side Rail (part #22), using the Bolts (part #47), Spring Washers
(part #66), and Nuts (part #61). (See Figure G.)
Then, reattach the Lens to the Side Running Light. Repeat this Step for the
remaining Side Running Light and the Front Right Side Rail (part #4).
(See Figure G.)
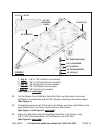
FIGURE G
RIGHT TAIL LIGHT (#82)
TAIL LIGHT BRACKET (#31)
LEFT
TAIL
LIGHT
(#80)
LICENSE
PLATE
BRACKET
(#32)
TA IL
LIGHT
BRACKET
(#31)
SIDE RUNNING LIGHT (#83)
REAR LEFT
SIDE RAIL
(#21)
REAR RIGHT
SIDE RAIL
(#21)
FRONT LEFT
SIDE RAIL
(#3)
FRONT RIGHT
SIDE RAIL
(#4)
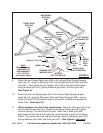
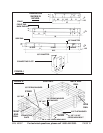
20. To install the Wiring Harness (part #84), temporarily loosen one Bolt (part #47)
that is located on the Coupler (part #1). To ground the Wiring Harness, bare
about 1” of the end of the White Ground Wire to expose its copper strands. Wrap
the exposed copper strands around and under the head of the loose Bolt. Then,
retighten the Bolt.
IMPORTANT: Make sure the surfaces of the Coupler and Bolt are clean
47
61
66
47
61
66