


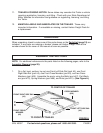

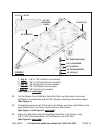


SKU 40597 For technical questions, please call 1-800-444-3353. PAGE 13
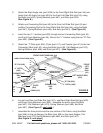
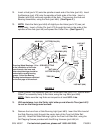
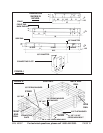
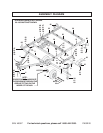
23. Connect the Wire Lead from the two Side Running Lights (part #83) to the Brown
Wire on each side of the Trailer. Then, insert Wire Clips along the entire length of
the Side Rails of the Trailer to hold down the Wiring Harness. (See Figure H.)
24. Run the Yellow/Brown Wires to the Left Tail Light (part #80). Strip the ends of
the Wires about 3/4”. Connect the Yellow Wire to the Red Wire of the Left Tail
Light. Then, connect the Brown Wire to the two Black Wires of the Left Tail Light.
(See Figure H.)
25. Run the Green/Brown Wires to the Right Tail Light (part #82). Strip the ends of
the Wires about 3/4”. Connect the Green Wire to the Red Wire of the Right Tail
Light. Then, connect the Brown Wire to the two Black Wires of the Right Tail
Light. (See Figure H.)
26. NOTE: It is recommended that only a qualified technician perform the electrical
service that may be needed to enable your particular make/model vehicle to
power the Trailer’s 12 volt DC lighting system.
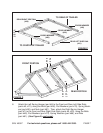
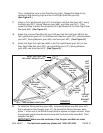
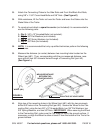
27. To attach a
bed
(not included) to the frame of the Trailer, it is recommended to
use the following parts:
A.
Qty. 1: 3/4” x 4’ x 8’ Plywood (not included).
B.
Qty. 18: 3/8” Cross Head Bolts (not included).
C.
Qty. 18: 3/8” Flat Washers (not included).
D.
Qty. 18: 3/8” Spring Washers (not included).
E.
Qty: 18: 3/8” Hex Nuts (not included).
(See Figure I,
next page.)
28. Measure the distance between the
eight
Stake Slots located on the outer edges
of the Trailer frame. Then, corresponding to the measurements, cut eight
3-1/2” x 1” slots in the edges of the 3/4” plywood. (See Figure I.)
29. Place the 3/4” squarely on the Tailer frame. As shown in the diagram, drill
eighteen mounting holes through the 3/4” plywood and the frame with a 3/8” high
speed metal drill bit. (See Figure I.)
30. Use the 3/8” Cross Head Bolts, 3/8” Flat Washers, 3/8” Spring Washers, and 3/8”
Hex Nuts to secure the plywood bed to the Trailer frame. (See Figure I.)
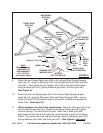
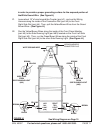
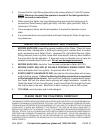
31. To attach
rails
(not included) to the Trailer, it is recommended to use the follow-
ing parts:
A. Qty. 8: 1.6” x 3.5” x 27” wood strips (not included).
B.
Qty. 6: 0.75” x 3.5” x 48” wood strips (not included).
C.
Qty. 6: 0.75” x 3.5” x 94.5” wood strips (not included).
D.
Qty. 4: 0.175” x 2” x 2” x 3.5” Steel Angle (not included).
E.
Qty. 16: 3/8” x 1-3/4” Hex Bolt (not included).