


Maintenance
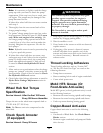
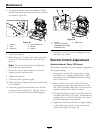
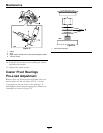
4. To adjust the brake, remove the hairpin, washer,
and clevis pin from the lower brake lever and yoke
as shown in Figure 28.
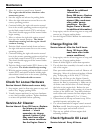
Figure 28
1. Jam nut 4. Lower brake lever
2. Yoke 5. Washer
3. Clevis pin
6. Hairpin
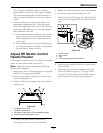
5. Loosen the jam nut.
6. Rotate the yoke. To tighten the brake, rotate the
yoke up. To loosen the brake, rotate the yoke
down.
Note: The brake rod should be threaded into
both yokes the same distance.
7. Secure the yoke to lower brake lever with the
hairpin, washer, and clevis pin.
8. Tighten the jam nut.
9. Check the brake operation again.
10. After the brake is adjusted, the lever switch needs
to be checked.
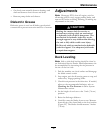
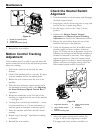
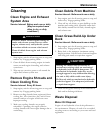
11. Check the gap between the brake lever and the
switch as shown in Figure 29. The gap needs to
be an 1/8 inch (3mm) with the brake engaged.
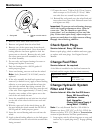
Figure 29
1. Switch
3. Brake lever
2. 1/8 inch (3mm) gap
needed between switch
and brake lever
12. If needed, loosen the screws holding the switch
and adjust the switch.
Electric Clutch Adjustment
Service Interval: Every 100 hours
The clutch is adjustable to ensure proper engagement
and proper braking.
1. Stop engine, wait for all moving parts to stop,
and remove key. Engage parking brake. Allow
the machine to cool completely before starting
these instructions.
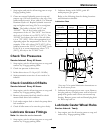
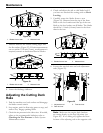
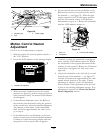
2. Insert a 0.015–0.021 inch (0.381–0.533 mm)
feeler gauge through one inspection slot in the
side of the assembly. Make sure it is between the
armature and the rotor friction surfaces.
3. The gap should be at least 0.015 (0.381 mm) and
not more than 0.021 (0.533 mm). If adjustment is
needed, then set at 0.015 (0.381 mm) for each of
the three adjustment slot positions.
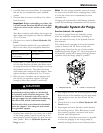
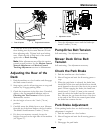
4. Tighten the lock nuts until there is slight binding
on the feeler gauge but it can be moved easily
within the air gap (see Figure 30).
38