


Maintenance
3. Move the motion control levers forward.
The engine should initiate shutdown after
momentary pause.
4. Start the engine and release the parking brake.
5. Move the right side motion control lever to the
center, operating position.
6. Continue holding the right side motion control
lever in the center, operating position and pull up
on the blade control switch (PTO) and release.
The clutch should engage and the mower blades
begin rotating.
7. Move or release the right side motion control
lever into the neutral position. The blades
should stop rotating and the engine should
continue running.
8. Push the blade control switch down and move
the right side motion control lever to the center,
operating position.
9. Continue holding the right side motion control
lever in the center, operating position and pull up
on the blade control switch (PTO) and release.
The clutch should engage and the mower blades
begin rotating.
10. Push the blade control switch (PTO) down to the
off position. The blades should stop rotating.
11. With the engine running, pull up the blade control
switch (PTO) and release without holding right
side motion control lever to the center, operating
position. The blades should not rotate.
Check for Loose Hardware
Service Interval: Before each use or daily
1. Stop engine, wait for all moving parts to stop, and
remove key. Engage parking brake.
2. Visually inspect machine for any loose hardware
or any other possible problem. Tighten hardware
or correct the problem before operating.
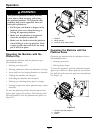
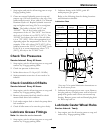
Service Air Cleaner
Service Interval: Every 250 hours—Replace
the primary air cleaner
element — check
secondary air cleaner
element; replace if dirty.
(May need more often
under severe conditions.
See the Engine Owner’s
Manual for additional
information.)
Every 500 hours—Replace
the secondary air cleaner
element (May need more
often under severe
conditions. See the
Engine Owner’s Manual
for additional information.)
1. Stop engine, wait for all moving parts to stop, and
remove key. Engage parking brake.
2. See the Engine Owner’s Manual for maintenance
instructions.
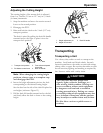
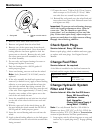
Change Engine Oil
Service Interval: After the rst 5 hours
Every 100 hours (May
need more often under
severe conditions.)
1. Stop engine, wait for all moving parts to stop, and
remove key. Engage parking brake.
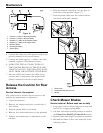
2. Drain oil while engine is warm from operation.
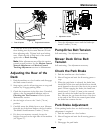
3. The oil drain hose assembly is located on the left
side of the engine.
Place pan under machine to catch oil. Remove oil
drain plug. Allow oil to drain and replace oil drain
plug. Torque plug to 20-24 ft-lb (27-33 N-m).
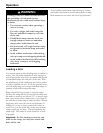
4. Replace the oil lter per the Engine Owner’s
Manual. Clean around the oil lter and carefully
remove the lter by unscrewing it. Make sure no
oil drains onto the belt drive or clutch through
the holes in the engine deck. Before the new
lter is installed, apply a thin coating of oil on the
surface of the rubber seal. Turn lter clockwise
until rubber seal contacts the lter adapter, then
tighten lter an additional 2/3 to 3/4 turn.
5. Clean around oil ll cap and remove cap. Fill to
specied capacity and replace cap.
6. Use oil recommended in engine owner’s manual.
Do Not overll. Start the engine and check for
leaks. Stop engine and recheck oil level.
7. Wipe up any spilled oil from engine deck
mounting surfaces.
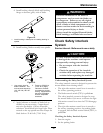
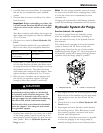
Check Hydraulic Oil Level
Service Interval: Every 40 hours
30