


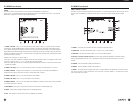


Sequentially press the button below MENU in the dis-
play until CLOCK MODES appears. If AUTO CLOCK SET
is OFF, press 1 to turn it ON. If AUTO CLOCK DST is
OFF, press 2 to turn it on if you want automatic day-
light saving time (recommended). For LOCAL TIME
OFFSET, if your country is east of the International
Dateline, press 3 to set it to +. If you are west of the
International Dateline, press 3 to set it to –. For exam-
ple, if you live in North or South America, set it to -. To
enter your specific LOCAL TIME OFFSET, press 4, then
use the numeric keypad to enter the number of hours
you are offset from GMT. For example, in North
America use 5 hours for EST, 6 hours CST, 7 hours MST,
8 hours PST. Press 9 (EXIT) when finished. After com-
pleting the above steps the E1 must be turned off.
While off, it will automatically tune to one of the
National Bureau Of Standards WWV stations for auto-
matic time-set. It will automatically tune to the
strongest WWV station it can find. At night, this is like-
ly to be 5000 or 10000 kilohertz. During the day it
may use 10000, 15000 or 20000 kilohertz. If the sig-
nal is not strong enough to activate auto-time-set, see
the owner’s manual to set the time manually.
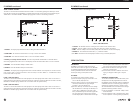
SETTING THE DISPLAY FOR LOCAL OR GMTTIME
With the radio turned on, sequentially press the TIME
key until CLOCKS appears in the display. Select GMT or
LOCAL by pressing the key to its right. W hen finished,
press the CLEAR/LOCK button.
SETTING THE TIMER AS AN ALARM CLOCK OR
SLEEP TIMER
Turn the E1 on.The following instructions are for set-
ting and activating Timer 1 as a wake up alarm and
Timer 2 as a sleep timer. Many more options are avail-
able. For more detailed timer instructions and capabili-
ties, refer to the owner’s manual.
NOTE: The timers will reference the time that has
been selected to show in the display, GMT or LOCAL.
Most customers will want to display LOCAL when
using the timers.
USING TIMER 1 AS A WAKE-UP TIMER (ALARM
CLOCK)
These instructions setTimer 1 to turn on as a wake-up
alarm and play the last station tuned to. Once on, the
E1 will play indefinitely or until turned off.
Sequentially press the MENU key to display the TIMERS
MENU. Press the‘1’ key to highlight the turn-on time.
Use the numeric keypad to enter the turn-on time in
24 hour time format. Press the STORE key.
Press the ‘2’ key to highlight the turn-off time. Use the
CLEAR/LOCK key to clear any entry that is present in
this window. Press STORE to save this null entry. Press
the ‘3' key to highlight the timer 1 mem channel. Press
CLEAR/LOCK to clear any entry in the window. Press
the STORE key to save this null entry.When finished,
press the ‘9' key to exit the timer programming mode.
Tune the E1 to the radio station that you wish to hear
when the timer turns on. Enable the timer with the
instructions provided below.
USING TIMER 2 AS A SLEEP TIMER
Sequentially press the MENU key to display the TIMERS
MENU. Use the‘4’ key to select the turn-on time and
clear any entry in this window using the CLEAR/LOCK
and STORE keys as described above. Press the ‘5’ key
to set a turn-off time as in the example above. Use the
‘6' key to highlight the timer 2 mem ch and clear any
entry that appears here using the CLEAR/LOCK and
STORE keys. When finished, press the 9 key to exit the
timer programming mode.Tune the E1 to the radio sta-
tion that you wish to hear. Enable the timer with the
instructions provided below. At the preset time, the
unit will turn off and will remain off until manually
turned on, or turned on by timer 1 if it is enabled.
TO ENABLE OR DISABLE THE TIMERS
Press the TIME key sequentially to show eitherTIMER 1
or TIMER 2 in the display. To enable the timer of your
choice, press the ENABLE key and assure that that
timer’s number appears in the upper right corner of the
display under the time.To disable the timer of your
choice, press the DISABLE key and assure that its num-
ber does not appear in the upper right corner of the
display under the time.To exit this mode, press the
TIME key until the normal radio frequency display
screen shows.
60
61
E
1 MANUAL
APPENDIX - etón E1 QUICK GUIDE continued