


16 17
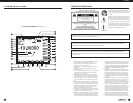
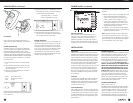
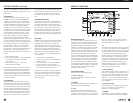
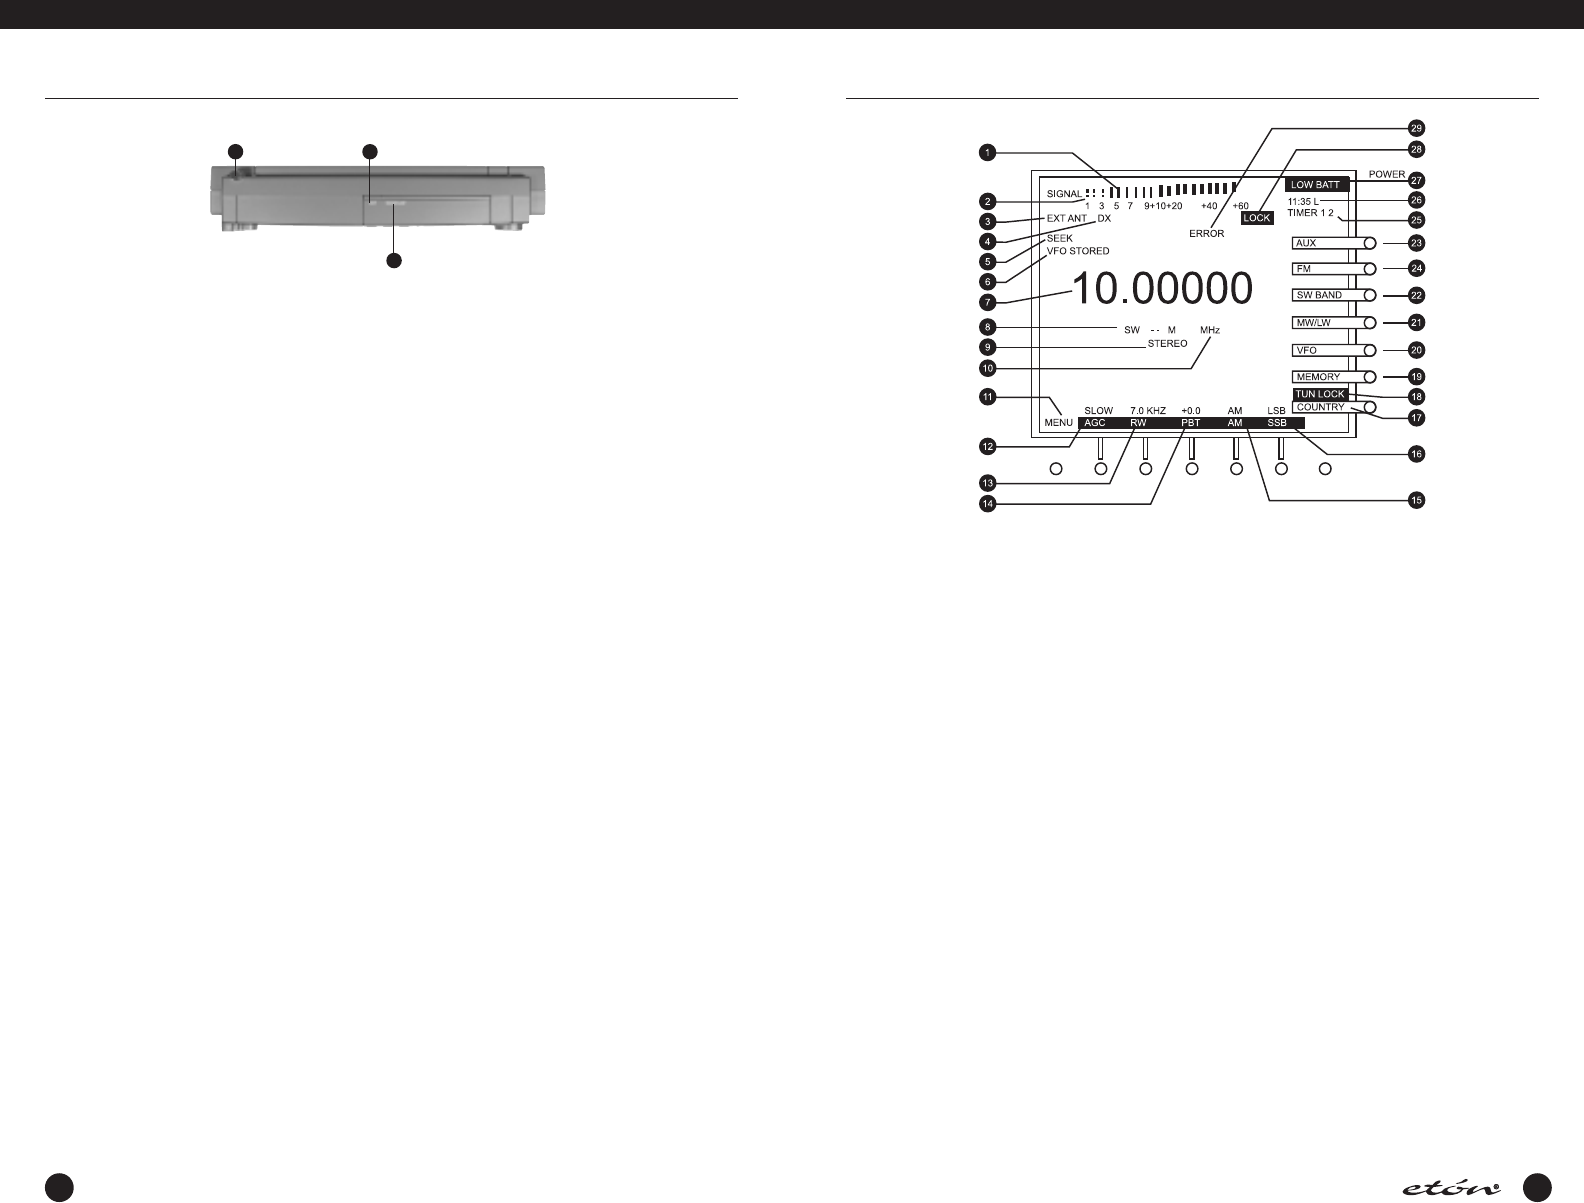
The following section describes the main display which
will be seen when operating in the VFO mode,This is
the display which the user will see most of the time.
There are several other screens which may appear on
this display under various conditions.These additional
conditions will be covered later.
1. SIGNAL
The signal meter indicates the signal strength of the
incoming signal. The stronger the signal, the more ver-
tical bars appear from left to right across the display.
From 100 through 30,000 kHz, the signal meter is cali-
brated in S units from 1 thru 9 and in decibels (dB)
above S9 up to +60 dB. On the FM band, the signa
strength is just relative.
2. SQUELCH LEVEL INDICATOR
This bar advances as the‘SQUELCH’ knob is turned
clockwise. It indicates the level at which the incoming
signal is strong enough to overcome the SQUELCH set-
ting. If the SQUELCH muting is enabled (which is done
by menu) a signal level that is higher than the
SQUELCH setting will be audible, while one that is
below the SQUELCH setting will not. A signal stronger
than the SQUELCH setting will cause scanning to stop
on that frequency if the “CARRIER” stop mode is
selected in the “RADIO SETTINGS” menu (item 2).
3. INTERNAL/EXTERNAL ANTENNA INDICATOR
EXT ANT or INT ANT will be displayed depending upon
whether or not the mode in use (FM or HF) has its
respective antenna switch on the side panel in the
internal or external position.
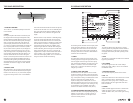
E1 DISPLAY DESCRIPTION
E
1 MANUAL
4. DX
This indicator appears when the DX key is pressed,
indicating that an RF preamplifier has been enabled to
improve performance on weak signals.The DX setting
will slightly reduce battery life when operating on bat-
tery power.
5. SEEK
This indicator is visible when the SEEK mode is enabled
by pressing the SEEK key.
6. VFO STORED
This indicator appears when the ‘TUNE’ softkey is
pressed.The ‘TUNE’ softkey is active in the COUNTRY
and MEMORY modes.
7. FREQUENCY DISPLAY
This is the main frequency readout of the receiver.
8. SW -- M
Indicates the meter band to which the receiver is tuned
when in SW mode. See the “Shortwave Band
Designators” table on page 22 for a listing of meter
bands. LW, MW or FM also appear here when those
bands are selected.
9. STEREO
STEREO or MONO appear here when on the FM band.
STEREO will appear if stereo is enabled from the
“AUDIO SETTINGS” menu, and a stereo signal is being
received.
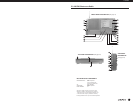
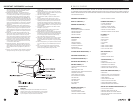
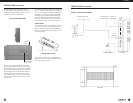
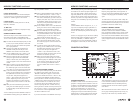
TOP PANEL DESCRIPTION
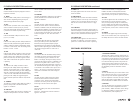
1.TELESCOPIC ANTENNA
This is a 39 1/4“ (1.003 meters) telescopic antenna for
use on all bands.
2. LIGHT
Pressing this key while the receiver is turned ON cycles
the display illumination through four brightness states;
Off, Dim, Medium and Bright.When the receiver is in the
OFF state and connected to external power, the display,
when lit, will be DIM. Pressing the ‘LIGHT button will
cycle the display illumination on and off with no time
out. If the unit is operating from batteries, the display will
be lit only briefly when the unit is turned OFF. If, when
OFF,the ‘LIGHT’ button is pressed once, the display will
illuminate for 10 seconds and then go out. In the ON
state, the display will be lit only briefly following control
inputs. However, holding down the LIGHT key for 3 sec-
onds will override the time out and allow the light to
remain on continuously when the receiver is ON.The user
must keep in mind, however that keeping the light on
continuously when operating on batteries will consider-
ably reduce battery life. More details concerning display
illumination can be found on page 57 under “DISPLAY
LIGHTING”.
3. SNOOZE / SLEEP
When the receiver is ON, or turned on by the timer, press-
ing this bar will activate the SNOOZE mode, causing the
receiver to turn OFF for 5,10, 20, or 30 minutes, depend-
ing upon the setting of item 5 of the “CLOCK MODES”
2
3
1
menu. After the selected number of minutes have passed,
the receiver will turn back on.To cancel a SNOOZE period
early, cycle power OFF/ON with the ‘POWER’ key.When
SNOOZE mode is active,“SNOOZE” will appear on the
display.
When the receiver is OFF, other than in SNOOZE,pushing
this bar will activate the SLEEP timer.This will turn the
receiver ON for the default set time of 15 minutes, after
which it will turn back OFF.To change the set time length
from the default 15 minutes to 1 through 99 minutes,
turn the receiver OFF and rotate the ‘TUNING’ control
after pressing the SNOOZE / SLEEP bar.After setting the
desired SLEEP time, press the bar again to activate SLEEP
mode, or automatic entry will occur in 15 seconds.The
displayed time is always in minutes.When SLEEP mode is
active, a flashing “s XX” will appear in the lower left
hand corner of the display, where “XX” is a number indi-
cating the minutes of SLEEP time remaining.