


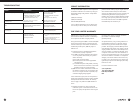

ENABLING/DISABLING TIMER OPERATION
Press the ‘TIME’ button.This will activate theTIMER 1 display. It will appear as shown in the “ENABLING/DISABLING
TIMER” illustration which follows.
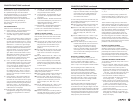
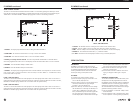
ENABLING/DISABLING TIMER
This display shows the start time and stop time set forTIMER 1 as well as the MEMORY or COUNTRY menu number, fre-
quency, and name (if any) programmed in for the TIMER 1 MEM CH.
To enable TIMER 1, press the ‘ENABLE’ softkey.This will cause “TIMER 1" to appear in the upper right hand corner of
this display (as well as all other displays and menus), indicating that TIMER 1 is enabled.
To disable TIMER 1, press the ‘DISABLE’ softkey. If TIMER 1 was the only one enabled, “TIMER 1" will disappear from
the display. If TIMER 2 was also enabled, only the ‘1' will disappear. If both timers are enabled you will see “TIMER 1
2"in the upper right hand corner of this and all other displays and menus.
To enable or disable TIMER 2, press the ‘TIME’ key again.This will activate theTIMER 2 display.This display is identical
to the TIMER 1 display except for its name. Follow exactly the same procedure to enable or disable TIMER 2.
To return to normal operation from theTIMER 2 display, press the ‘TIME’ key twice.The first press will take you to the
CLOCKS display, and the second will take you back to the VFO, MEMORY or COUNTRYdisplay.
Note that repeatedly
pressing the ‘TIME’ key will cycle through the TIMER 1, TIMER 2, CLOCKS, and normal screens.
SPECIAL USE FEATURES AND FUNCTIONS
The etón E1 receiver has several special features that
are referred to in the main body of this USE AND CARE
GUIDE, but may require additional explanation.
LOCKALL ENTRY TO KEYPAD
The receiver front panel keys with the exception of the
‘CLEAR/LOCK’ key may be locked or disabled by pressing
and holding the ‘CLEAR/LOCK’ key for 3 seconds. Press the
‘CLEAR/LOCK’ key and hold for 3 seconds.An acknowl-
edging beep will be heard, and both “LOCK” and“TUN
LOCK”will appear on the front panel display after 3 sec-
onds to indicate that the front panel keys and ‘TUNING’
control are locked.
Press the‘CLR/LOCK’ again for 3 seconds to unlock the
front panel keys and‘TUNING’ control.The beep will again
be heard when the key is pressed and the“LOCK” and
“TUN LOCK” indications on the front panel display will
disappear after 3 seconds, indicating that the‘TUNING’
control and front panel keys have been released.
44 45
E
1 MANUAL
CLOCK AND TIMER FUNCTIONS continued
CLOCK AND TIMER FUNCTIONS continued
• Press ‘3' for “TIMER 1 MEM CH”.You will see a reverse video curser appear.
• Press ‘1',‘4',‘6',‘0'.
• You will see “TIMER 1 MEM CH 1460“.
• Press the ‘STORE’ key to save this entry in memory.
• You will hear a beep, the reverse video curser will go away, the menu numbers on the left will return, and the
entered COUNTRY channel will be stored in the TIMER 1 memory.
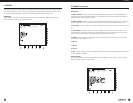
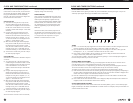
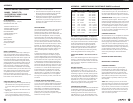
MENU – TIMERS
If it is desired to set TIMER 2, use the same procedure as that for TIMER 1. If you want TIMER 1 or TIMER 2 to turn
on the receiver to what ever frequency was tuned in last, simply clear the channel information from the respective
TIMER 1 MEM CH or TIMER 2 MEM CH as follows:
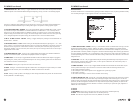
• Press theTIMERS menu ‘3' or ‘6' as desired on the ‘Direct-Key-Input’ keypad.This will cause the selected menu line
to display a reverse video curser, and the menu line numbers will disappear.Assuming menu item 3 for TIMER 1
was selected, the line will appear as follows:“TIMER 1 MEM CH 1460“.
• Press the ‘CLEAR / LOCK’ key on the ‘Direct-Key-Input’ keypad.This will produce a beep and will cause any numbers
in the reverse video curser to disappear.
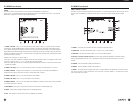
• Press the ‘STORE’ key. This will cause another beep, the menu numbers will reappear, the reverse video curser will
disappear, and this null information will be stored in memory, Use this same procedure if you choose to store null
information for TIMER 2.To exit the timer menu and go back to a normal operating mode, press ‘9' on the ‘Direct-
Key-Input’ keypad.