


36 37
E
1 MANUAL
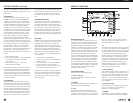
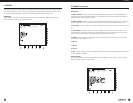
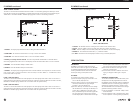
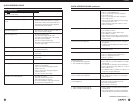
1. TIMER 1 - This display entry identifies this menu as being associated with Timer 1.
2. START TIME - This shows the time that Timer 1 is set up to turn on when enabled.
3. STOP TIME - This shows the time that Timer 1 is set to turn off when enabled.
4. Memory or Country channel selected - This menu entry identifies the MEMORY or COUNTRY channel
which was programmed into Timer 1. This is the frequency that will be received when the Timer 1 on time is
reached.
5. DISABLE - Press the‘DISABLE’ softkey to disableTimer 1.
6. ENABLE - Press the‘ENABLE’ softkey to activate Timer 1.
7. TIMER 1 - This display entry will appear when Timer 1 has been enabled. It will be present on all menus and dis-
plays as long as Timer 1 is active. If both Timer 1 and 2 are active, it will read “TIMER 1 2". If neither timer is active,
it will not be visible on any menu.
TIMER 1 ENABLE / DISABLE
This menu is used to enable and disable event timer number 1. It is reached by pressing the ‘TIME’ key once.The ON
time, OFF time, and MEMORY or COUNTRY channel shown on this menu must be entered using the TIMERS
menu.
E1 MENUS continued
E1 MENUS continued
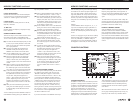
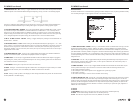
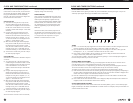
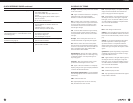
TIMERS
This menu is used to set the ON time, OFF time, and associated MEMORY or COUNTRY for
timers 1 and 2. It is reached by pressing the ‘8' (MORE) key from the CLOCK MODES menu or the‘5' key from the
MAIN MENU. It appears as is shown in the following illustration.
1. TIMER 1 ON TIME - Press ‘1' to set the start time for timer number 1. When ‘1' is pressed, the menu numbers
will disappear,“ENTER NUMBER & PRESS“STORE”TO ENTER” will appear at the bottom of the display, and the
timer 1 start time window will change to reverse video.To set the time, enter the numbers on the ‘Direct-Key-Input’
keypad. When the numbers have been entered, press the ‘STORE’ key. This will cause a beep to be heard, the menu
numbers will reappear, and the timer 1 start time window will change back to normal video, indicating that the start
time has been stored in memory.
Example: Enter a start time of 11:30 for Timer 1
• Press the ‘1' key. Menu numbers will disappear and the time entry window for Timer 1 will appear in reverse video.
• To enter 11:30 hours, press ‘1', ‘1',‘3', ‘0' on the ‘Direct-Key-Input’ keypad.
• Press the ‘STORE’ key. You will hear a confirming beep, the entered time will return to normal video and the menu
numbers will reappear.
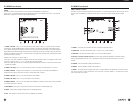
2. TIMER 1 OFF TIME - Press ‘2' to set the off time for timer 1.Proceed in the same manner as in 1 above.
3. TIMER 1 MEM CH - Using the same technique as in 1 and 2 above, key in the number of the MEMORY or
COUNTRY channel that you want the E1 receiver to receive when timer 1 activates.
4. TIMER 2 ON TIME - Press ‘4' to set the start time for timer number 2.
5. TIMER 2 OFF TIME - Press ‘5' to set the off time for timer number 2.
6. TIMER 2 MEM CH - Press ‘6' to set the number of the MEMORY or COUNTRY channel that you want the etón
E1 to receive when timer 2 activates.
7. MAIN MENU - Pressing the ‘7' key returns the user to the main menu as described previously.
8. MORE - Scrolls forward through available menus as described previously.
9. EXIT - Exits the menu loop and returns to the VFO, MEMORY or COUNTRY.