


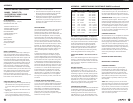


INTRODUCTION
This Quick Guide outlines the basics for listening to
AM, FM and Shortwave. It also covers setting the clock
and timers and storing stations into memory. Not all
features and capabilities of the E1 are addressed here.
We encourage you to refer to the owner’s manual for a
full understanding of the E1.
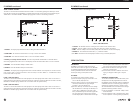
SET-UP INFORMATION
Power the E1 with the AC adaptor or insert 4 new,
identical alkaline D size batteries of the same brand
and type (never intermix non-identical batteries). The
battery compartment is accessed via the outer and
inner door on the lower left front of the E1. When
inserting 4 D alkaline batteries, follow the battery
polarity diagram printed on the inner door. Turn the E1
and off by pressing the POWER button.
For FM and Shortwave reception, pull up the telescopic
antenna.
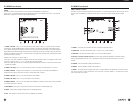
The buttons (also called keys), knobs and switches
referred to in this Quick Guide can be found by care-
fully looking at the radio. Some of the buttons (also
called ‘keys’) are located surrounding the display
(LCD).The function of these buttons is defined within
the LCD. Full descriptions of controls and their loca-
tions are found in owner’s manual pages.
Note that the AM broadcast band, 520-1710 KHz,is
designated as MW (Medium Wave) in the display and
in all explanations.While using this Quick Guide, set
the SQUELCH knob fully counterclockwise, assure that
both ANTENNA switches are in the INTERNAL position
and use the DX button to assure that DX appears in
the upper left area of the display.
If reception is poor, get very close to a window.The
construction materials of some buildings block signals.
TUNING-IN FM AND MW STATIONS
Stations are tuned-in with the SELECT button, the
TUNING knob, by Direct Frequency Entry (see below) or
the SEEK key (see below). If you are in Europe, the
Middle East or in the Mediterranean area, LW stations
can also be accessed (there are no LW broadcast sta-
tions in the Americas).
USING DIRECT FREQUENCY ENTRY
Direct frequency entry is performed by pressing the
numbered keys and can be used for FM, MW, LW and
SW. Enter the frequency with the numbered keys. After
the last key is pressed, the frequency will auto enter
after a delay of a few seconds.While entering a fre-
quency, if an incorrect frequency is entered, pressing
the CLEAR/LOCK key will clear the entry in progress.
FM frequencies always have a decimal point in them,
e.g. 88.5 MHz.Be sure to include this decimal point in
your entry.
The slight auto-entry delay that occurs after entering
the last digit of the frequency can be eliminated as fol-
lows. After entering an FM frequency, press the ‘.’ key
once. After entering a MW, SW or LW frequency that is
in KHz, press the ‘.’ key twice.With this method, the
decimal key acts as an ‘ENTER’ key and causes imme-
diate response to the entered frequency, eliminating
the delay.
USING THE SEEK FEATURE
The SEEK feature (often called auto-tuning) enables
the tuner to automatically scan and stop on stations.
To engage this feature, press the SEEK key. Scanning
automatically starts and will stop when a stations is
found. It is normal for the SEEK feature to sometimes
stop on noise.The SEEK can be stopped manually by
pressing the SEEK button.
Do You Need Help?
Monday-Friday, 8:30 a.m. - 4:00 p.m.,
North American PacificTime.
1-800-872-2228 from the U.S.
1-800-637-1648 from Canada
1-650-903-3866, worldwide
FAX: 650-903-3867
customersvc@etoncorp.com
www.etoncorp.com
Mailing Address:
etón Corporation
1015 CorporationWay
Palo Alto, CA 94303
USA
58 59
E
1 MANUAL
APPENDIX - etón E1 QUICK GUIDE continued
APPENDIX - etón E1 QUICK GUIDE
LISTENING TO SHORTWAVE STATIONS
Absolutely no technical knowledge is necessary to fully
enjoy listening to shortwave stations from around the
world. It’s crucial to understand ‘bands’. The owners
manual’s APPENDIX has all the information needed for
this. Below is some condensed information.
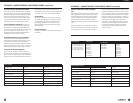
A complete shortwave band chart is in the owner’s
manual. Only the most used bands are mentioned
below. The band name and frequency range is shown.
Note that some of the ranges below are slightly
expanded compared to those in the owner’s manual.
13m, 21450-21850 KHz; 16m, 17480-17900 KHz;
19m, 15100-15800 KHz; 22m, 13570-13870 KHz;
25m, 11600-12200 KHz; 31m, 9200-10000 KHz; 41m,
7100-7600 KHz; 49m, 5800-6200 KHz; 60m, 4750-
5060 KHz.
CHOOSING THE BEST SHORTWAVE BAND
Here are the best bands for the various times of day.
This information is true worldwide. Notice that some
bands overlap several periods of the day. It always
pays to experiment.
• SUNRISE AND EARLY MORNING, 5 - 9 a.m.: 25,
31, 41, and 49 meters are usually good.
• MID DAY: 13, 16, 19, 22 and, in some areas, 25
meters. Sometimes these bands open up early, so
test them in the morning too.
• LATE AFTERNOON AND AROUND SUNSET: 19,
22, 25, 31, 41 and 49 meters.
• NIGHT: 60, 49, 41, 31, 25 meters, with 49, 31 and
25 usually the best. In the summer months, the 16
and 19 meter day bands sometimes stay open at
night.
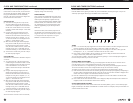
GETTING INTO A SHORTWAVE BAND
Press the ‘SW BAND’ key twice to highlight SW BAND
in the display (if the E1 is already in SW, then only one
press is needed). Note that, for just a few seconds, ‘SW
BAND’ is highlighted in the display and that the two
dashes ‘- -‘ or meter band numbers are flashing in the
display, under the frequency.Within 3 seconds, use the
numbered keys to enter the band of your choice.
Alternately, use the SELECT button or the tuning knob
to scroll through the available meter bands. The new
band number will replace the flashing dashes or the
old band number. Stop on the band that you wish to
select and it will ‘autoenter’ within about 3 seconds.
TUNING AROUND IN A SHORTWAVE BAND
After you have used the techniques described above to
get into a shortwave band, the radio is tuned to the
lowest frequency in that band. To tune through the
band you must tune upward in frequency. Use the
SELECT button, TUNING knob or the SEEK button to
find and tune-in stations. If you are new to shortwave,
for best results, stay within the frequency ranges of the
shortwave bands shown in this Quick Guide.
STORING FREQUENCIES INTO MEMORY
Storing a frequency into memory involves three basic
steps: 1.Tune to the station/frequency that you wish to
store. 2. Select the memory to store it into. 3. Store it.
First, tune to the station/frequency that you wish to
store. To store it, do the following in a quick, smooth
sequence. Press STORE, then use the TUNING knob or
the SELECT key to select the desired memory number
that you wish to store into. Press the STORE button
twice to complete the storing process and exit the
memory mode. For memory labeling instructions and
other memory information, refer to the owner’s manu-
al.
ACCESSING WHAT YOU HAVE STORED INTO
MEMORY
Press the MEMORY key to access the memory mode.
Use the TUNING knob or the SELECT key to scroll
through the memory numbers and listen to the desired
stored station. To exit memory mode, press the VFO
button.
DELETING THE CONTENTS OF A MEMORY
Access the desired memory channel number as
described above. Press and hold the DELETE key for
about 3 seconds or until its frequency disappears from
the selected memory channel location. To exit memory
mode, press theVFO button.
SETTING THE CLOCK TO YOUR LOCAL TIME
This procedure shows how set the clock automatically.
The receiver must be OFF with the appropriate antenna
connected for WWV setting.
For manual clock setting and more detailed clock set-
ting information, consult the owner’s manual.