


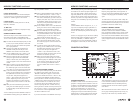

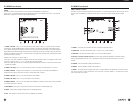


SETTING TIMER ON/OFF TIMES
Enter the TIMERS menu by pressing the ‘MENU’ key to reach MAIN MENU, and then pressing the ‘5' key on the
‘Direct-Key- Input’ keypad.This brings up the TIMERS menu as shown below.
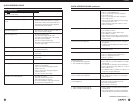
TIMERS
(1) Press ‘1' on the ‘Direct-Key-Input’ keypad.This will cause the menu numbers on the left to disappear and the ON
time entry forTIMER 1 will turn to reverse video, as shown here:“TIMER 1 ON TIME 11:30“
(2) Key in the desired ON time for TIMER 1, ignoring the colon. For example, for an ON time of 18:41, press the
following keys:‘1',‘8',‘4',‘1'.The TIMER 1 ON TIME curser will now show “18:41”.
(3) Press ‘STORE’ to save the TIMER 1 ON time in memory.You will hear a beep, the reverse video window will
change to normal video, and the menu numbers will return.
To set the OFF time forTIMER 1, select item 2 from the menu by pressing ‘2' on the ‘Direct-Key-Input’ keypad and
follow the same procedure as you used to set ON time.
SETTING A WAKE OR SLEEP TIMER
If you want a timer to act as a wake timer only, you would program an ON time and clear an OFF time.This will
cause the receiver to turn on at the designated time and stay on until turned off manually.
If you want the timer to act as a sleep timer only, you would clear any existing ON time and program an OFF time.
This will cause the receiver to turn off at a designated time and stay off until turned on manually.
To program only an off time, or only an on time, clear the unwanted time on the selected timer as follows:
(1) Select the timer ON time or OFF time to be cleared by pressing the ‘Direct-Key-Input’ keypad key corresponding to
the menu number of the desired timer ON time or OFF time.This will cause the menu numbers to disappear and a
reverse video curser to appear on the selected timer ON time or OFF time.
(2) Press the ‘CLEAR/LOCK’ key on the ‘Direct-Key-Input’ keypad.This will cause the numbers in the reverse video
curser to disappear. Only the colon will remain.
(3) Press ‘STORE’.This will cause the reverse video curser to disappear, a beep will be heard, the menu numbers will
reappear, and the null time information will be stored in memory.
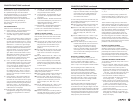
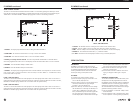
SETTING TIMER MEMORY CHANNELS
To set the memory channel on the E1 receiver which will be activated byTIMER 1, press ‘3' on the ‘Direct-Key-Input’
keypad, and then key in the number of the MEMORY or COUNTRY channel. For example, assume you want TIMER 1 to
activate COUNTRY channel 1460.
42 43
E
1 MANUAL
CLOCK AND TIMER FUNCTIONS continued
CLOCK AND TIMER FUNCTIONS continued
be set manually.This is accomplished using the SET
CLOCKS menu. To reach this menu, the unit must be in
the ON state.Then press the ‘MENU’ softkey.This will
bring up the MAIN MENU. From the MAIN MENU,
press the ‘3' key on the ‘Direct-Key-Input’ keypad.This
will activate the SET CLOCKS menu.
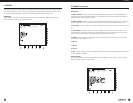
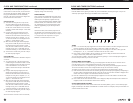
Setting Local Time
(1) To set the Local time, press the ‘1' key.This will
cause the numbers along the left side of the SET
CLOCKS menu to disappear, and the time shown to
the left of the ‘LOCALTIME SET’ line on the menu
to appear in reverse video. Example:“ LOCALTIME
SET 00:00”
(2) Using the ‘Direct-Key-Input’ keypad, key in the
desired time, ignoring the colon. (HINT: Key in a
time about one minute ahead of the actual time.)
Example: For 16:05, press in sequence ‘1', ‘6',‘0',
‘5'.The Local time set line on the display will now
appear as:“ LOCAL TIME SET 16:05"
(3) When the actual time agrees with the displayed
time, press the ‘STORE’ key.This will cause a beep,
the entered time will now be shown in normal
video, the menu numbers will return, and the clock
will begin running. Line 1 of the MENU will now
look like the following: “1 LOCAL TIME SET 16:05"
(4) To exit the SET CLOCKS menu, press the ‘9' key on
the ‘Direct-Key-Input’ keypad.
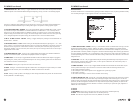
Setting GMT Time
Access the SET CLOCKS menu as described in the previ-
ous section.
(1) To set GMT, press the ‘2' key.This will cause the
numbers along the left side of the MENU -CLOCKS
menu to disappear, and the time shown to the left
of the “GMT TIME SET” line on the menu to
appear in reverse video. Example:“GMT TIME SET
00:00”
(2) Using the ‘Direct-Key-Input’ keypad, enter the
desired time, ignoring the colon. (HINT: Key in a
time about one minute ahead of the actual time.)
Example: For 21:05, press in sequence ‘2', ‘1',‘0',
‘5'.The Local time set line on the display will now
appear as:“ GMT TIME SET 21:05".
(3) When the actual time agrees with the displayed
time, press the ‘STORE’ key.This will cause a beep,
the entered time will now be shown in normal
video, the menu numbers will return, and the clock
will begin running. Line 2 of the MENU will now
look like the following: “2 GMTTIME SET 21:05".
(4) To exit the SET CLOCKS menu, press the ‘9' key on
the ‘Direct-Key-Input’ keypad.
NOTE: If the AUTO CLOCK SET is left in the ON state,
then manual setting of the clock may result in only a
temporary change of the time settings
.
TIMER OPERATION
The E1 includes two programmable event timers allow-
ing the receivers to turn ON or OFF at preset times.The
timers may be used separately or together and may
recall a currently displayed frequency, MEMORY channel,
COUNTRY channel, or a combination of those. In addi-
tion, programming only an OFF time provides a Sleep
timer, and programming only an ON time provides a
Wake timer.
Note that the timers, when activated, respond to the
last displayed clock. Programming the timers is a three
step process. Step one is to set the ON time, and step 2
is to assign the OFF time. Step three is to assign a
MEMORY or COUNTRY channel to a timer.