


22
©
2005
Directed Electronics, Inc. all rights reserved
3.
SSeelleecctt tthhee rreecceeiivveerr cchhaannnneell::
Press and release the Valet/Program button the
number of times necessary to access the desired channel.
NOTE: If adding a remote, a button must be taught to the unit in the Channel 1 or Channel 5
position prior to programming other channels.
Press and hold the Valet/Program button once more. The siren will chirp and the LED will blink
the number of times corresponding to the channel that is accessed.
4.
PPrreessss tthhee ttrraannssmmiitttteerr bbuuttttoonn::
While holding the Valet/Program button, press
the button from the transmitter that you wish to assign to the selected channel.
The unit will chirp indicating successful programming. It is not possible to
teach a transmitter button to the system more than once.
CChhaannnneellss ##22,, 55,, 66::
Channels 2, 5, and 6 are used to assign the arm, disarm and panic functions to
separate buttons on the remote control. Teaching a button to Channel 5 or Channel 1 erases some
information about that remote from memory, and auxiliary functions that are desired may have to
be reprogrammed.
CChhaannnneell #
#99::
If any button from a known transmitter is programmed to Channel 9, all transmitters
will be erased from memory and the system features will revert to the default settings. This is useful
in cases where the one of the customer's transmitters is lost or stolen. This will erase any lost or
stolen transmitters from the system's memory. It can also be used to start from scratch if the trans-
mitter buttons were programmed incorrectly.
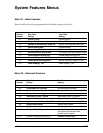
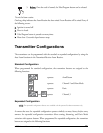
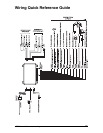
Channel Number Function Wire Color
1 Arm/Disarm
2 Panic only
3 Silent Mode/Remote Valet/Trunk Release RED/WHITE
4 Remote Start or other accessories WHITE/BLUE
5 Arm only
6 Disarm only
7 Auto-learn Expanded Configuration*
(optional four-button transmitter)
8 Auto-learn Standard Configuration*
9 Delete all transmitters
*NOTE: For Auto Learn Configurations, see
Transmitter Configurations
section of this guide.