


2.1
MAP PAGE
9
10
2.1
MAP PAGE
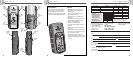
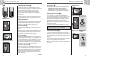
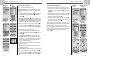
Map Page Ẅ
The Map page displays a graphic representation of the navigation currently
in progress. Any waypoints, routes or tracks that you are using will be
displayed. A black
▲ (triangle) in the middle points to the direction you are
currently traveling. A data field at the bottom of the screen shows you
information of your choosing about your position or navigation. You can
zoom in and out on the map image by using the ZOOM IN/OUT button. You
have a number of options for customizing the display, (details below).
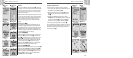
Selecting Options Ẅ ẅ
From the Map page, press and release the ENTER button to display the Map
Page Options menu. Use the ZOOM IN/OUT button to scroll through the
menu sections, then press the ENTER button to go to the highlighted option.
Use the ZOOM IN/OUT button again to highlight your choice, then press the
ENTER button to select it. Press the PAGE button to return to the main page.
Orient Option ẅ Ẇ
Highlight and select ORIENT to designate the orientation of the map display.
To make the screen always represent magnetic north, highlight and select
NORTH UP (see
Ẅ). To make the screen always represent the direction
of travel, highlight and select TRACK UP (see
Ẉ).
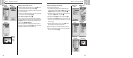
Set Data Option ẅ ẇ Ẉ
Highlight and select SET DATA to choose the information about your current
position or navigation that you want to be displayed at the bottom of the
Map page. Highlight and select FULL MAP to show the entire image of the
map currently in use (see
Ẉ). Highlight and select from the following for
display at the bottom of the page: Accuracy, Average Speed, Bearing, Date,
Destination, Elevation, ETA, Location, Maximum Speed, Odometer, Power,
Speed, Time, Trip Odometer, Trip Time (see
Ẅ). (For more information about
the optional data selections, see “Data Descriptions,” page 4)
continued
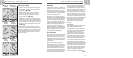
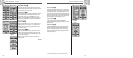
Ẅ Map Page
(North Up)
ẅ Select Options
Ẇ Orient Map
Display
ẇ Set Data
Display
Using the Map Page
Ẉ Full Map
(Track Up)
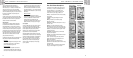
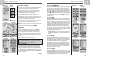
Using the Map Page
Ẋ Set Auto Zoom ẉ Map Details
Ẍ Defaults
On/Off
ẋ Stop Nav
On/Off
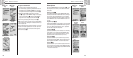
Map Detail Option ẅ ẉ
Highlight and select DETAIL to show/hide any or all of the details to be
displayed on the map. These details include names of waypoints, waypoint
symbols, your navigational route and travel completed so far (track).*
Auto Zoom Option ẅ Ẋ
Highlight and select AUTO ZOOM to turn this feature on or off. When this
feature is on, the scale of the map adjusts automatically to show the entire
navigation currently in progress. When this feature is off, you adjust the
scale of the map manually using the ZOOM IN/OUT button.*
Stop Nav Option ẅ ẋ
To stop the current navigation (GoTo, Route or Track), highlight and select
STOP NAV. Highlight and select YES to stop. Highlight and select NO to
make the current navigation continue.*
Defaults Option ẅ Ẍ
Highlight and Select DEFAULTS to restore all original default Map page
settings. Highlight and select YES to restore original settings to map
Orientation = North Up; Data field information = Speed; map Details
shown = Names, Symbols, Route, Track; Auto Zoom = On. Highlight
and select NO to maintain all current settings.
*See “Using the Nav Data Page,” page 15, to learn about this feature.