


2.4 2.4
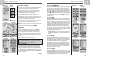
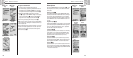
NAV DATA PAGE
Tracks
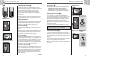
When you select TRACKS from the Nav Data page (see Ẅ), your GPS 100
S will display a list of the tracks currently stored. Your unit will automatically
record a track as you travel. You can store up to 10 tracks and later recall
any of those tracks to use for navigation. Your unit can guide you along a
selected track in either direction.
NOTE: Your GPS 100 S automatically begins tracking your travel whenever
it is turned on and linked to satellites. It keeps the recorded travel stored in
its log even when the power is turned off, starting a new tracking "session"
when it is turned back on. Old tracks will remain in memory (2,000
tracking points) unless erased by user (see "Deleting Individual Tracks,"
page 28).
Selecting Options Ẅ ẅ
From the Nav Data page, highlight using the ZOOM IN/OUT button and
select TRACKS by pressing the ENTER button to display the Tracks screen.
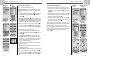
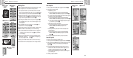
Use the ZOOM IN/OUT button to scroll through the list of tracks, then press
the ENTER button to go to the highlighted track. Use the ZOOM IN/OUT
button again to highlight your choice, then press the ENTER button to select
it. Press the PAGE button to return to the main page.
Log Option ẅ Ẇ ẇ Ẉ
Highlight and select LOG to save the current track or scroll to recall a track
saved previously
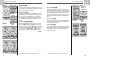
ẅ. Highlight and select SAVE Ẇ to save either THIS
SESSION
ẇ (the travel recorded since the unit was last turned on) or the
ENTIRE LOG
ẇ (all travel recorded since the log was last cleared) (see
CLEAR below). You can either accept the default name (the current date)
or rename the track before saving
Ẉ (see “Editing Text,” page 29).
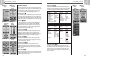
Highlight and select CLEAR
Ẇ to clear the log of all travel that has been
recorded. The unit automatically restarts recording your travel.
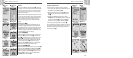
Select Option ẅ ẉ Ẋ ẋ Ẍ
Highlight and select any stored track for navigation, renaming or deletion ẅ.
Highlight and select NAVIGATE
ẉ and then FORWARD or REVERSE Ẋ to
display the map page showing you the direction to travel to follow on the
selected track. Highlight and select RENAME
ẉ to change the name of a
selected track
ẋ (see “Editing Text,” page 29). Highlight and select
DELETE
ẉ to delete the selected track Ẍ.
ẅ View Stored
Tracks
Ẅ Nav Data
Page
Ẇ Save or
Recall Track
ẇ Save Options
Ẉ Name Track
ẉ Accessing
Tracks
Ẋ Direction
ẋ Enter Name
Ẍ Delete
NAV DATA PAGE
Tracks: Summary
2019
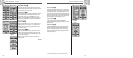
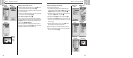
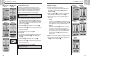
Navigate a Selected Track
To make the map show the navigational path along a selected track:
1. From the Nav Data Page, highlight using the ZOOM IN/OUT button and
select TRACKS by pressing the ENTER button
Ẅ.
2. Highlight and select the track you want to navigate ẅ. A map of the
selected track appears with three selections: Navigate, Rename and
Delete
Ẇ.
3. Highlight and select NAVIGATE to navigate through your selected
track
Ẇ. Highlight and select FORWARD to navigate from the beginning
to the end of the selected track
ẇ. Highlight and select REVERSE to
navigate from the end to the beginning of the selected track
ẇ.
4. This will bring up the Map page with the track path shown Ẉ.
While in the Gauges Page, Track navigation is illustrated by a curved double
line and hiker icon in the bottom right-hand corner of the screen. Also, your
selected track and distance to complete the navigation of that track are
shown above the compass
ẉ.
ẅ Stored
Tracks
Ẅ Nav Data
Page
Ẇ Track Preview
and Options
Ẉ Navigation
on Map
ẉ Navigation on
Gauges Page
Track: Navigation
ẇ Directions