


26
2.4
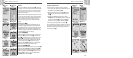
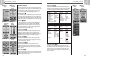
NAV DATA PAGE
2.4
NAV DATA PAGE
25
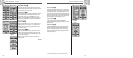
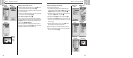
Routes: Navigation Delete Options: Summary
Delete Options
When you select DELETE OPTIONS from the Nav Data page (see Ẅ), you can
delete waypoints, tracks or routes that you have created or delete all data
currently stored.
Selecting Options Ẅ ẅ
From the Nav Data page, highlight and select DELETE OPTIONS to display
the Delete Options screen. Use the ZOOM IN/OUT button to scroll through
the menu sections, then press the ENTER button to go to the highlighted
option. Use the ZOOM IN/OUT button again to highlight your choice, then
press the ENTER button to select it. Press the PAGE button to return to the
main page.
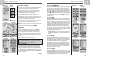
Waypoints Option ẅ Ẇ
Highlight and select WAYPOINTS if you wish to delete any or all of the waypoints
you have stored. Highlight and select ONE-BY-ONE to delete waypoints one
at a time (see “Deleting Individual Waypoints,” page 27). Highlight and
select ALL to delete all waypoints currently stored.
Tracks Option ẅ Ẇ
Highlight and select TRACKS if you wish to delete any or all of the tracking
sessions currently in memory. Highlight and select ONE-BY-ONE to delete
track sessions one at a time (see “Deleting Individual Tracks,” page 28).
Highlight and select ALL to delete all tracks currently in memory.
Route Option ẅ ẇ
Highlight and select ROUTE if you wish to delete the route you currently
have stored. Highlight and select DELETE – YES and the entire route will be
deleted. Highlight and select DELETE – NO to cancel the delete function.
All Option ẅ Ẉ
Highlight and select ALL if you wish to delete all waypoints, tracks and the
route you currently have stored. Highlight and select DELETE ALL NAV DATA –
YES and the data will be deleted. Highlight and select DELETE ALL NAV DATA
– NO to cancel the delete function.
ẅ Access Delete
Options
ẇ Delete
Routes
Ẉ Delete All
Data
Ẅ Nav Data
Page
Ẇ Delete
Waypoints
or Tracks
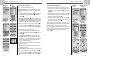
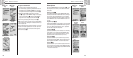
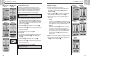
Navigate a Selected Route
To make the map show the navigational path along the route:
1. From the Nav Data Page, highlight using the ZOOM IN/OUT button and
select ROUTE by pressing the ENTER button
Ẅ. A map of the selected
route appears with four selections: Navigate, New, Edit and Details
ẅ.
2. Highlight and select NAVIGATE to navigate through your selected
route
ẅ. Highlight and select FORWARD to navigate from the beginning
to the end of the selected route
Ẇ. Highlight and select REVERSE to
navigate from the end to the beginning of the selected route
Ẇ.
3. This will bring up the Map page with the route path shown ẇ.
NOTE: You can view the list of waypoints in the route by selecting DETAILS
in the route options screen. Selecting OK in the Details screen will return you
to the route options screen.
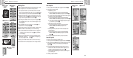
While in the Gauges Page, Route navigation is illustrated by a group of flags
and hiker icon in the bottom right-hand corner of the screen. Also, the next
waypoint on your route navigation and the distance to that waypoint are
shown above the compass
Ẉ.
ẅ Navigate
Route
Ẅ Nav Data
Page
ẇ Navigation
On Map
Ẇ Direction
Ẉ Navigation on
Gauges Page