2.4
NAV DATA PAGE
2.4
NAV DATA PAGE
Waypoints: Creating New Waypoints: GoTo
18
“GoTo” a Selected Waypoint
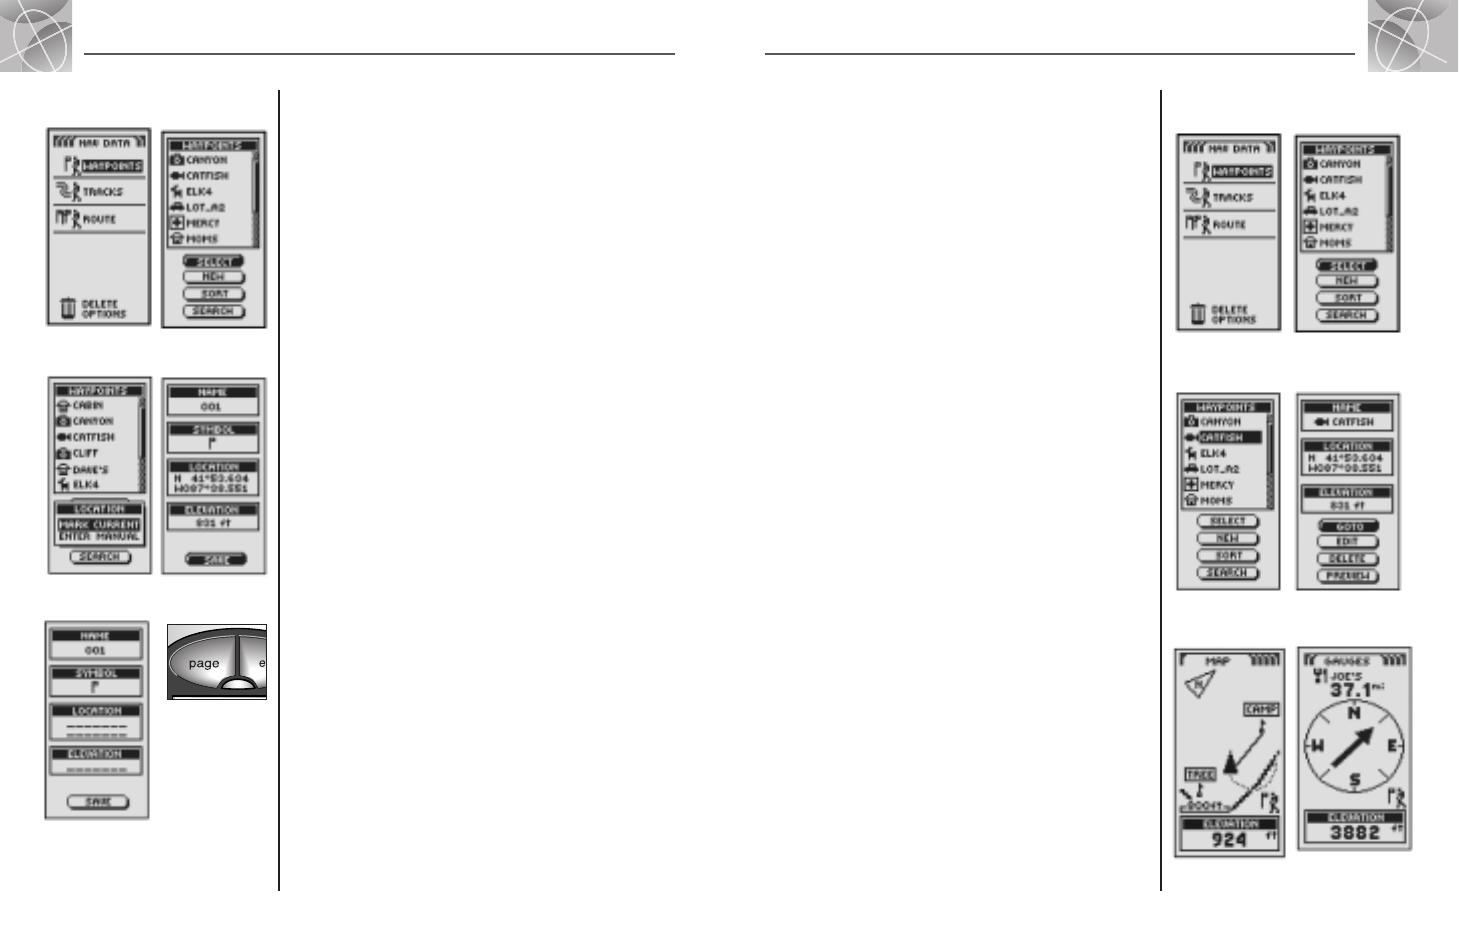
To make the map show the navigational path to a selected waypoint:
1. From the Nav Data Page, highlight using the ZOOM IN/OUT button and
select WAYPOINTS by pressing the ENTER button
Ẅ. Highlight and select
SELECT
ẅ.
2. Highlight and select the waypoint you want to navigate or “GoTo” Ẇ.
The waypoint information screen for that waypoint appears with four
selections: GoTo, Edit, Delete and Preview
ẇ.
3. Highlight and select GOTO to navigate to your selected waypoint ẇ.
This will bring up the Map page with the GoTo path between your current
position and the selected “GoTo” waypoint
Ẉ.
NOTE: You can Preview the selected waypoint’s location on the map by
selecting PREVIEW in the waypoint information screen. Selecting OK in the
Preview screen will return you to the waypoint information screen.
While in the Gauges Page, a navigation or “GoTo” is illustrated by a flag and
hiker icon in the bottom right hand corner of the screen. Also, your selected
GoTo waypoint and distance to that waypoint are shown above
the compass
ẉ.
17
Creating a New Waypoint
To mark your current location as a new waypoint:
Waypoint shortcut: To mark a new waypoint using current location,
press and hold the ENTER button for 2 seconds. A confirmation window
will pop up.
1. From the Nav Data Page, highlight using the ZOOM IN/OUT button and
select WAYPOINTS by pressing the ENTER button
Ẅ Highlight and
select NEW
ẅ.
2. Highlight and select MARK CURRENT Ẇ. The waypoint information screen
appears
ẇ. A default name (a 3-digit number) and symbol (a flag) will
be assigned. You can either accept the default name and symbol or rename
and change the symbol of the waypoint (see "Editing Text", page 29).
3. When you have finished editing your new waypoint, select SAVE ẇ to
return to the main Nav Data page
Ẅ. To return to the main Nav Data
Page without saving the new waypoint, press the PAGE button
ẉ.
To enter any location as a new waypoint manually:
1. From the Nav Data Page, highlight using the ZOOM IN/OUT button
and select WAYPOINTS by pressing the ENTER button
Ẅ Highlight and
select NEW
ẅ.
2. Highlight and select MANUAL Ẇ. The waypoint information screen
appears
Ẉ. A default name (a 3-digit number) and symbol (a flag)
will be assigned. You can either accept the default name and symbol or
rename and change the symbol of the waypoint (see "Editing Text,"
page 29). The Location field will blink.
3. Enter the location (latitude and longitude) of your new waypoint,(see
"Editing Text," page 29).
4. Highlight Elevation, the field will blink. Enter the location's elevation
(see "Editing Text," page 29).
NOTE: ELEVATION does not need to be entered to save your new waypoint.
5. When you have finished editing your new waypoint, select SAVE ẇ to
return to the main Nav Data page
Ẅ. To return to the main Nav Data
Page without saving the new waypoint, press the Page button
ẉ.
ẅ New
Waypoint
Ẅ Nav Data
Page
ẇ Information
Screen
Ẇ Current or
Manual
Ẉ Information
Screen
ẉ Return to Nav
Data Page
ẅ Selecting Stored
Waypoint
Ẅ Nav Data
Page
Ẇ Select
Waypoint
Ẉ “GoTo” on
Map Page
ẉ “GoTo” on
Gauges Page
ẇ Waypoint
Information
