


31
4. Remove battery from vehicle. Make sure that the battery has good ventilation. The process causes the
release of hydrogen and oxygen. An accumulation of these gases presents a real danger of explosion.
5. Open the battery cap, if removable.
6. Fill the battery with distilled water according to the manufacturer’s instructions. Since batteries may rapidly
bubble while being charged, remember to refill (only with distilled water) after the equalization process is
complete and the voltage is back to normal.
7. Follow the steps in the “Charging the Battery” section of this manual.
8. Push the Battery Type Selector Switch until “WET” is displayed. (This mode will only work if a WET battery
is selected.)
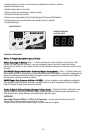
9. Choose the correct charge rate and start charging. You can check the battery voltage by pushing the Battery
Voltage button. This will trigger the Battery Voltage indicator.
10. Push the Equalize button at any time and the battery will automatically begin to equalize in 2 amp limited
current. Note that in order to push the recessed button you will need a small pin or ballpoint pen.
11. Every hour, the temperature should be checked by touching the battery. If the battery is hot to the touch,
stop the charging and allow the battery to cool.
12. The voltage rises, but does not go over 15.3v to 16.2v (2.55-2.7v per cell) depending on ambient
temperature, it will automatically adjust.
13. The “WET” LED flashes while the charger is in equalize mode.
14. The digital readout will show “FUL” when the equalization process is complete.
E
E
n
n
g
g
i
i
n
n
e
e
S
S
t
t
a
a
r
r
t
t
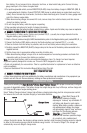
The Engine Start function can supply 80 amps for engine starting.
1. Set the 2/10/30 AMPS button to 30 amp mode and immediately press the 80A button switch to activate the
Engine Start mode.
2. The digital display will countdown from “999” to “000.”
3. When the “000” count is reached and begins flashing on the Display, the vehicle is ready to start.
4. Crank the engine using manufacturer’s guidelines, typically in 3 to 5 second bursts. The high current engine
starting function requires a resting/cooling period between tries. The charger will switch back to regular
charge mode after 5 seconds and will not allow operation in this mode for 4 minutes. Wait 4 to 5 minutes
before a second attempt at starting the engine, if needed.
5. During the rest period, the battery is charging at 2 amps. After engine starts, follow the steps outlined in
“Important Safety Instructions” at the front of this manual to disconnect.
A
A
l
l
t
t
e
e
r
r
n
n
a
a
t
t
o
o
r
r
C
C
h
h
e
e
c
c
k
k
P
P
a
a
r
r
t
t
1
1
NNoo LLooaadd
(Turn OFF all vehicle’s accessories): The battery must be fully charged before testing the alternator.
Run the engine long enough to achieve normal idle speed and verify there is a no-load voltage.
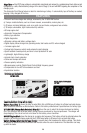
1. Press Alternator Check to start the check.
2. Alternator Good LED will light to indicate the alternator is good, or F07 will display to indicate the alternator
is out of typical voltage range.
3. Press Alternator Check again to stop the test.
P
P
a
a
r
r
t
t
2
2
UUnnddeerr LLooaadd
(Accessories ON): Next, load the alternator by turning on as many accessories as possible (except
for A/C and DEFROST)
1. Press Alternator Check to start the check.
2. Alternator Good LED will light to indicate the alternator is good, or F07 will display to indicate the alternator
is out of typical voltage range.
3. Press Alternator Check again to stop the test.
If the first alternator check indicates a good alternator and the second indicates the alternator is not good, the
problem could stem from: loose fan belts, an intermittent diode failure or possibly bad connections between the
battery and alternator and/or ground.