


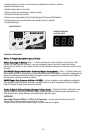


30
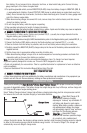
If Digital Display shows “F06”, the Red (Positive) and Black (Negative) clamps are incorrectly connected to
battery terminals. Follow the steps outlined in “Important Safety Instructions” at the front of this manual to
disconnect, then reconnect in correct polarity.
C
C
h
h
a
a
r
r
g
g
i
i
n
n
g
g
t
t
h
h
e
e
B
B
a
a
t
t
t
t
e
e
r
r
y
y
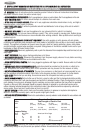
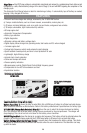
1. Press Battery Type selector until desired battery type LED lights.
NNoottee::
The default selection is “GEL” type battery.
2. Press 2/10/30 AMP button to begin charging at the 2 amp rate; the unit sounds a beep and displays
charging current. The charger starts charging at 2 amp rate automatically if 2/10/30 AMP button is not
pressed within 3 minutes after applying AC power.
If the Display on the charger varies between “F03” and the amp rate, the battery is sulfated and the charger
is trying to give it some charge. If after approximately 3 hours the display just shows “F03”, then the
battery will not charge.
Charger occasionally sounds a beep and displays “0.0” during self-test or charging stage changes.
3. Pressing the 2/10/30 AMP button again advances charging rate to 10 amps. Pressing once more advances
charging rate to 30 amps. (Pressing the button again will turn OFF the charger output and the Display will
show “000”.) This selection and actual battery charge rate are monitored by the microprocessor, and the
unit will stop charging if the selected rate is too fast or too slow for battery size or condition.
As the battery nears full charge capacity, the unit’s output will automatically drop to a lower charge rate.
Pressing the 2/10/30 AMP button repeatedly advances to standby mode; the unit sounds a beep, displays
“000” and stops charging.
4. The battery charger displays the charge current. To view the battery voltage, press BATTERY VOLTAGE
button. The charger will sound a beep and display the battery voltage. Press the BATTERY VOLTAGE button
again to return to displaying the charge current.
5. The display shows “FUL” when the battery is fully charged.
6. Follow the steps outlined in “Important Safety Instructions” at the front of this manual to disconnect.
A
A
u
u
t
t
o
o
m
m
a
a
t
t
i
i
c
c
F
F
l
l
o
o
a
a
t
t
C
C
h
h
a
a
r
r
g
g
i
i
n
n
g
g
Automatic Float Charging is ideal for maintaining a fully charged battery.
1. Keep the AC power and battery connected after battery is fully charged.
2. The charger monitors the battery and tops it off as needed.
3. The Float Charge indicator lights and the display shows charge current when topping off the battery and
returns to “FUL” when completed.
4. To view battery voltage, press the Battery Voltage button.
NNoottee::
Charging can be terminated by pressing the charge rate selector button at any time when unit is
charging. After AC power interruption, charging restarts at 2 amp rate automatically and the battery type will
default to “GEL”.
WWAARRNNIINNGG::
If battery size is not known, charge at the 2 amp rate. DO NOT overcharge batteries.
E
E
q
q
u
u
a
a
l
l
i
i
z
z
i
i
n
n
g
g
Equalizing is the process by which the fluid in each of a battery’s cells is equalized. This process occurs after
charging is complete.
WWAARRNNIINNGG:: BBUURRSSTT HHAAZZAARRDD::
• NEVER EQUALIZE A GEL OR AGM BATTERY, these may burst and cause SERIOUS INJURY and property
damage.
• Remove or disconnect the vehicle’s battery when equalizing.
The frequency which the equalization process needs to be run depends on the use of the battery. The more the
battery is used, the more undercharged it becomes; thus the more frequently the battery should be equalized.
1. Do not use this mode on sealed or valve regulated batteries. This mode is only meant for wet
(unsealed/vented) batteries.
2. Make sure there are no flammable sources near the recharging sight.
3. Wear safety glasses, gloves and protective clothing.