Outside
Caution: DO NOT push the beds or slideout in until ALL Velcro® is detached. Push
the bed and slideout in COMPLETELY before beginning to lower the roof. Failure
to push in the beds and slideout completely BEFORE lowering the roof can damage
the tent components. Your warranty does not cover this damage.
For Models With Slideouts
a. Unfasten the Velcro® and snaps from the slideout and place the tent inside the
slideout.
b. Push the slideout into the travel position.
c. Pull the tent out of the slideout to ensure that the bed slides do not rip the tent.
Caution: Make sure the slideout tent is pulled to the outside of the unit before the
beds are pushed in. Failure to do this could result in cutting the slideout area tent.
8. Unfasten all Velcro® located under beds.
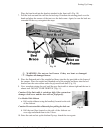
9. Remove the straight bed braces and push the beds in carefully and completely.
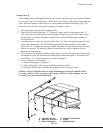
10. Remove the curved bed braces. Place all braces under the bed mattresses carefully.
(Fig. 9)
11. Lower the roof half to two-thirds down. Reach inside and distribute the awning panel
of the tent and drape it EVENLY across the beds and slideout (if applicable).
12. Continue to lower the roof until the final 6-8". Using both hands and arms, push the
tent from each side, front and rear, into the center of camper evenly and carefully
continue to lower roof.
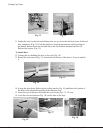
13. Attach the roof latches to the clips (Fig. 7). Due to air pockets, the roof may need to
be pushed down with your hand the last 1-2".
14. Before removing the crank, tighten the cable system by turning the crank in the “UP”
movement to make it taut taking caution not to overtighten. This will place slight
tension on the cable system and avoid cables becoming loose and entangled.
Caution: It is very important to place tension on the cable system to prevent them
from becoming tangled. If the cables become tangled, it could lead to breakage of
the lifter cables when the roof is raised.
15. Remove the crank and place it in the storage area inside the camper.
16. Close and latch the door to the crank compartment.
17. Raise the stabilizer jacks to their upright position. Insert the crank and turn it
counterclockwise until the jack is tight, then turn crank an additional 1/8 of a turn
(snug tight).
48 Jay Series/Baja/Select Folding Camping Trailer
Setting Up Camp...


