


Creating and Using Routes
A Route is a sequence of intermediate waypoints
that lead you to your nal destination. The GPSMAP
60Cx lets you store 50 routes with up to 250 points
each.
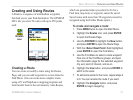
Setting up a route
Routes
icon
Creating a Route
You can create or modify a route using the Routes
Page, and you can add waypoints to a route from the
Find Menu. (You can create more complex routes
using a PC and MapSource mapping programs and
then transfer them to the unit memory. Auto-Routes,
which are generated when you select Go To for a
Find item, map item, or waypoint, cannot be saved.
Saved routes with more than 50 waypoints cannot be
navigated using the Follow Roads option.)
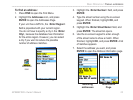
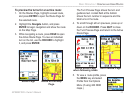
To create and navigate a route:
1. Press MENU twice to open the Main Menu.
2. Highlight the Routes icon, and press ENTER
to open the Routes Page.
3. Use the ROCKER to highlight the New button,
and press ENTER to open the Route Page.
4. With the <Select Next Point> eld highlighted,
press ENTER to open the Find Menu.
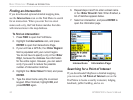
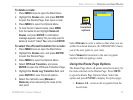
5. Use the Find Menu to select a route waypoint
from one of the Find Menu groups, and open
the information page for the selected waypoint,
city, exit, point of interest, and so on.
6. Highlight the Use button, and press ENTER to
add it to the route.
7. To add more points to the route, repeat steps 4
to 6. You can rename the route if you want.
8. Highlight the Navigate button, and press
ENTER to begin navigating.
GPSMAP 60Cx Owner’s Manual 31
bAsIc oPerAtIon > creAtIng And usIng routes