5INSTALLATION
W
EBASTO
S
CHOLASTIC
S
ERIES
5-10
5.8 Wiring Connections
5.8.1 General Information
The control unit is equipped with low voltage protection, therefore it is imperative to keep vehicle batteries in good
condition. Red labeling or markings indicating 12 volts identify electrical components for the Scholastic Series heater.
Green labeling or markings indicates 24 volt components, which are not suitable for this version of heater.
CAUTION
To protect the electronic control unit when welding is performed on the vehicle, the heaters main power supply wires
must be disconnected from the main power source and temporarily grounded to the chassis.
NOTE
The Webasto heating system will not perform to your satisfaction with weak batteries.
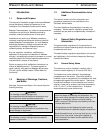
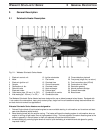
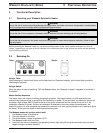
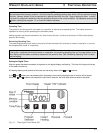
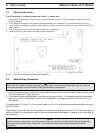
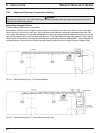
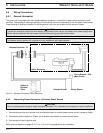
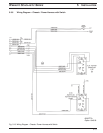
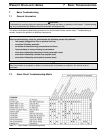
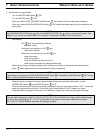
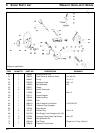
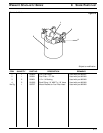
Fig. 5-9: Harness Connection Points (Overview)
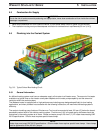
5.8.2 Connecting Power Harness to a Constant Power Source
1. Route and secure the wire harness from the Webasto heater to constant power source and cut harness to length.
2. Connect the positive leads to a 30 amp. circuit breaker connected to a constant power source.
3. Connect ground lead to ground stud.
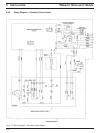
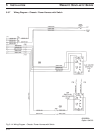
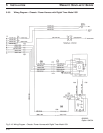
Refer to wiring diagrams on pages 5-13, 5-14, 5-15 and 5-16 appropriate to your installation.
CAUTION
Leave round waterproof harness to heater enclosure connector (P1) uncoupled until completion of heater installation.
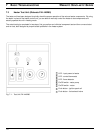
Chassis Ground Power Source
Circuit Breaker - 30A
(Main Power)
Fuses
Harness Connector - P1
Switch or
Optional
Timer
Heater Enclosure