


7
Activating/Deactivating Standby Mode
Standby mode is a power-saving feature that conserves laser battery life.
Press and hold the laser’s or remote control’s manual button for 3 seconds to activate standby mode.
Note: When standby mode is activated, the laser beam, rotor, self-leveling system, and LEDs shut
down, but the HI alert remains activated.
To let you know that the laser is in standby mode, the battery LED fl ashes every 4 seconds.
To deactivate standby mode and restore full operation of the laser, press and hold the laser’s or remote control’s
manual button for 3 seconds.
The laser and all other functions turn on again.
Using the Rotation Mode
The rotation control button 9 sets the laser into rotation mode. Scan mode is stopped.
Repeatedly pressing the button toggles the laser through 0, 50, 200, 600 RPM.
The laser always powers up in the last selected rotation speed.
Note: The zone-scan button can be used to stop the beam’s rotation.
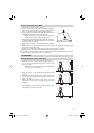
Using the Pointing Mode
Laser
If the beam’s rotation is stopped during horizontal operation, the up and down arrow buttons at the laser can
be pressed to move the beam (small line) gradually counterclockwise or clockwise (360°).
During vertical operation, the up /down arrow buttons can be used to move the small line left/right.
Remote Control
If the beam’s rotation is stopped during horizontal operation, the remote control’s left and right arrow buttons
can be pressed to move the beam gradually counterclockwise or clockwise (360°).
During vertical operation, the left /right arrow buttons can be used to move the beam counterclockwise/
clockwise.
By pressing and holding either button, the movement of the small line will be accelerated.
Note: The fi rst 4 seconds, the beam moves in fi ne pointing speed, then it moves in course speed.
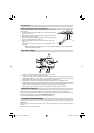
Using the Scan Mode
Pressing and releasing the zone-scan button at the laser or remote control sets the laser to scan mode.
Rotation mode is stopped.
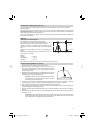
The unit starts at an opening angle of approx. 3 degrees. Repeatedly pressing the zone-scan button increases
the angle to approx. 8, 45, 90, 180 and 0 degrees.
Pressing the up or down button at the laser or the right or left arrow button at the remote control moves the
scan zone clockwise or counterclockwise until the desired position is reached.
Note: In self-leveling mode (horizontal), the up arrow button increases the zone-scan size (up to
180º), and the down arrow button decreases the size (down to 3º).
Note: The rotation control button can be used to stop the scan mode.
Using the Manual Mode
Pressing the manual button on the laser or the remote control changes the laser from automatic self-leveling
mode to Manual mode. Manual mode is indicated by the fl ashing (once every second) red LED 5.
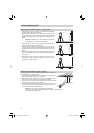
In Manual mode (horizontal), the Y-axis can be sloped by pressing the Up- and Down-Arrow-buttons on the
laser‘s keypad or the remote control. Additionally, the X-axis can be sloped by pressing the Left- and Right-
Arrow-buttons on the remote control.
In vertical mode, the up and down arrow buttons align the laser beam to the right/left side,
and the left and right arrow buttons at the remote control adjust the slope of the laser beam.
To resume automatic self-leveling mode, press the manual button again.
Using the Y- or X-Axis Single Slope Mode
To activate the Y-axis single slope mode, press the manual button (1 second) after the up arrow button at the
laser or remote control has been pressed and released. This is indicated by the simultaneously fl ashing red
5 and green 4 LEDs (once every second).
071016_01_HV101_GB.indd 7071016_01_HV101_GB.indd 7 27.11.2007 15:13:19 Uhr27.11.2007 15:13:19 Uhr