


11
OPERATION
To install dies, follow the instructions below for your model
of crimping head.
1. If the hydraulic hoses are connected:
• Turn the hydraulic system control valve OFF.
• Disconnect rst the hydraulic input (supply) hose, then
the output (return) hose.
2. Clean the surfaces of the die holder to remove any dirt or
grease.
3. Select the dies for the task:
• If the die load has not been veried, select blank dies
and verify die load.
• If the die load has been veried, select a set of dies to
match the sleeve or connector to be crimped.
TO INSTALL DIES ON STANLEY OR BURNDY
CRIMPING HEADS - Y35 STYLE
Install the die to the Retainer Die Yoke:
1. Insert and center the die until it clicks into place.
Install the die to the Die Piston Assembly or Ram:
1. Press the die release pin at the side of the die piston
asembly or ram.
2. Insert and center the die.
3. Release the pin to lock the die in place.
TO INSTALL DIES ON STANLEY OR KEARNEY
CRIMPING HEADS - PH2 STYLE
Install the die to the C-Frame:
1. Loosen the capscrew at the side of the C-frame.
2. Press the stub on the die into the socket.
3. Tighten the capscrew to retain the die.
Install the die to the push rod.
1. Loosen the capscrew at the side of the push rod.
2. Press the stub on the die into the push rod socket.
3. Tighten the capscrew to retain the die.
TO INSTALL DIES ON KEARNEY CRIMPING
HEAD -WH3 STYLE:
Install the die to the C-Frame:
1. Loosen the capscrew at the side of the C-frame.
2. Press the stub on the die into the socket.
3. Tighten the capscrew to retain the die .
Install the die to the push rod.
1. Loosen the capscrew at the side of the push rod.
2. Press the stub on the die into the push rod socket.
3. Tighten the capscrew to retain the die.
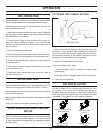
Make sure the hydraulic system control valve is in the OFF
position when coupling or uncoupling the hoses. Failure to
do so may result in damage to the quick couplers and cause
overheating of the hydraulic system.
Before installing the hoses, wipe the ttings and the entire
length of the hoses with a clean, dry lint-free cloth to remove
any dirt or moisture. Dirty connections can contaminate the
hydraulic uid, causing rapid wear and early failure of internal
pars.
Check the ow indicators (arrows) stamped on the couplers
to ensure oil ows in the proper direction. The female coupler
on the tool is the inlet coupler.
It is a good practice to connect the output (return) hose rst
and disconnect it last to minimize or avoid trapped pressure
within the tool.
1. Connect the output hose to the OUT or T port on the tool.
2. Connect the input hose to the IN or P port.
3. Be sure all hose connections are tight.
DIE LOAD VERIFICATION
With blank (test) dies installed, use a die load tester to verify
the crimping force in the tool before operating a new crimping
tool, before placing the tool in service after storage or repair
or periodically during normal use
1. Make sure blank (test) dies are installed in the die holder.
If not, follow the Die Installation instructions at the beginning
of this section.