


• 8 •
12. BEFORE RETURNING FOR REPAIRS
12.1 When a starting problem arises, make certain that the battery is capable of accepting a
normal charge. Double check all connections, the Instant Power™ battery charge level,
the battery clips for correct polarity and the quality of the connections from the cables to
the clips and from the clips to the battery system. The clips must be clean.
12.2 When an UNKNOWN OPERATING PROBLEM arises, please read the complete manual
and call the customer service number for information. This will usually eliminate the
need for return.
If the above solutions do not eliminate the problem, or for information about troubleshooting,
call toll-free from anywhere in the U.S.A.
1-800-621-5485
7:00 am to 5:00 pm Central Time, Monday through Friday
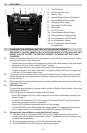
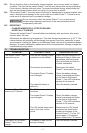
13. SPECIFICATIONS
Internal Battery Type Maintenance-free AGM Lead-acid
Nominal Voltage 12V DC
Capacity 18 Ah
DC Power Outlet (Max. Continuous Load) 15A
Peak Amps 950
Jumper Cables 4-gauge AWG (21.14 mm
2
), 28" (71 cm)
Dimensions (H x W x D) 11 x 12.75 x 7 Inches (28 x 32.5 x 17.75 cm)
Product Weight 19 lbs. (8.5 kg)
14. REPLACEMENT PARTS/ACCESSORIES
Male-To-Male Accessory Cable .........................................................................94500109
Air Compressor Accessory Kit (3 Adapters) ...................................................0099000599
Battery Clip Jaw Replacement Kit ..................................................................2299001580
14.1 Battery Clip Replacement
1. Make sure the ON/OFF switch on the front panel is in the OFF (O) position and the
Instant Power™ is not plugged into a 120V AC wall outlet.
2. Secure the clamp in the open position using a vise or equivalent clamping device.
WARNING: The clips are spring-loaded, so use caution when replacing the jaws, to
avoid injury.
3. Remove the rear screw that attaches the Instant Power™ cable to the jaw.
4. Remove the screw holding the copper jaw to the plastic clip. Repeat for other jaw.
5. Remove the two jaws and braided cable.
6. Reverse the steps to install the replacement parts.