


• 20 •
12. ANTES DE DEVOLVER A REPARACIONES
12.1 Cuando surja un problema de carga, asegúrese de que la batería puede recibir una
carga normal. Vericar dos veces todas las conexiones, el nivel de carga de la batería
del Instant Power™, los ganchos de la batería para lograr una polaridad correcta y la
calidad de las conexiones de los cables a los ganchos y de los ganchos al sistema de la
batería. Los ganchos deben estar limpios.
12.2 Cuando surja un PROBLEMA DE FUNCIONAMIENTO DESCONOCIDO, por favor
lea todo el manual y comuníquese con el número de atención al cliente para más
información. Esta generalmente se elimina la necesidad de retorno.
Si las soluciones descriptas no eliminan el problema o por información sobre la solución de
problemas, puede llamar a la línea gratuita desde cualquier lugar de los EE.UU.
1-800-621-5485
7:00 am a 5:00 pm, hora central de lunes a viernes
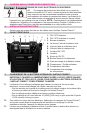
13. ESPECIFICACIONES
De Tipo interno AGM
Batería AGM de Acido-plomo, sin necesidad
de mantenimiento
El voltaje nominal De 12V de C.C.
Capacidad 18 ampere/hora
Salida de Corriente Contínua (Máxima Carga) 15A
Máximo Amp 950
Cables de arranque
AWG, de Calibre 4 (21,14 mm
2
) y 28 pulgadas
(71 cm)
Dimensiones (A x A x P) 11 x 12,75 x 7 pulgadas (28 x 32,5 x 17,75 cm)
Peso del Producto 19 libras (8,5 kg)
14. REPUESTOS/ACCESORIOS
Cable accesorio macho a macho.......................................................................94500109
Juego de accesorios del Compresor de aire
(3 adaptadores de manguera) .......................................................................0099000599
Battery Clip Jaw Replacement Kit ..................................................................2299001580
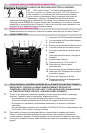
14.1 Battery Clip Replacement
1. Make sure the ON/OFF switch on the front panel is in the OFF (O) position and the
Instant Power™ is not plugged into a 120V AC wall outlet.
2. Secure the clamp in the open position using a vise or equivalent clamping device.
WARNING: The clips are spring-loaded, so use caution when replacing the jaws, to
avoid injury.
3. Remove the rear screw that attaches the Instant Power™ cable to the jaw.
4. Remove the screw holding the copper jaw to the plastic clip. Repeat for other jaw.
5. Remove the two jaws and braided cable.
6. Reverse the steps to install the replacement parts.