-
60
-
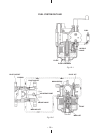
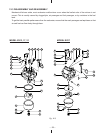
The procedures for overhauling the carburetor are described below. (Refer to Fig. 11-3.)
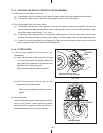
12-3-1 THROTTLE SYSTEM
(1) When the throttle stop screw is removed, the spring can be taken out.
(2) Remove the phillips screw and the throttle valve , then take out the throttle shaft .
When removing the throttle valve, take care not to damage the valve edge.
12-3-2 CHOKE SYSTEM
(1) Remove the choke valve . Then pull out the choke shaft .
(2) When reassembling the choke shaft, be sure to position the cutout on the choke valve facing the pilot air
jet.
12-3-3 PILOT SYSTEM
(1) Remove the pilot jet . Use the correct tool so as to avoid damaging the jet.
(2) When reassembling the pilot jet, be sure to firmly tighten it, otherwise fuel may leak, leading to engine
malfunction.
12-3-4 MAIN SYSTEM
(1) Remove the bolt and remove the float chamber body .
(2) Remove the main jet from the body .
(3) Remove the main nozzle from the body .
(4) When reassembling the main system, be sure to fasten the main jet and main nozzle firmly to the body,
otherwise the fuel concentration in the fuel/air mixture may become too rich, leading to engine malfunction.
(5) The tightening torque of the bolt is 9 N m (90 kgf cm / 6.5 ft lb.). Be sure not to forget to mount the
washer.
12-3-5 FLOAT SYSTEM
(1) Take out the float pin and then remove the float and the needle valve .
Since the needle valve is linked to the float , take care when assemble.
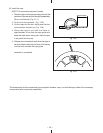
Do not use drill or similar objects for cleaning the jets, as these are likely to damage the orifices, which
in turn can impair fuel flow. Use compressed air to clean the jets.
The float pin is pressed into the carburetor body. When removing the needle valve and the float, a rod
or a similar tool slimmer than the float pin should be used. Tap the reverse side gently and remove.


