


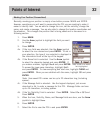
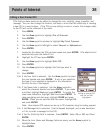

Editing a User-Created POI
POIs that you have saved can be edited to change the icon, visibility, name, elevation, and
message. You can also change the location, but keep in mind that this effectively is creating
a new POI in a new location. If the POI you are editing is used in a route, the changes made
to the POI will not be reflected in the route.
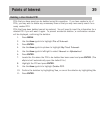
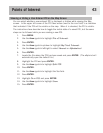
1. Press
MENU.
2. Use the
Arrow joystick to highlight Pts of Interest.
3. Press
ENTER.
4. Use the Arrow joystick up/down to highlight My Pts of Interest.
5. Use the
Arrow joystick left/right to select Nearest or Alphabetical.
6. Press ENTER.
7. Locate the file where the POI has been saved and press
ENTER. (The eXplorist will
automatically open the default file.)
8. Highlight the POI and press
ENTER.
9. Use the Arrow joystick to highlight Edit POI.
10. Press
ENTER.
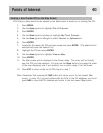
11. Use the
Arrow joystick to highlight the field you want to
change.
12. Press ENTER.
13a. If the Icon field is selected: Use the
Arrow joystick to select
the icon desired and press
ENTER. To aid in your selection,
the type of icon selected is displayed in the information
block at the top of the keypad.
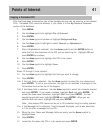
13b. If the Name field is selected: Use the
Arrow joystick to
select the character desired and press
ENTER. If you make
a mistake, highlight
Back and press ENTER. To access the
lower-case characters, highlight
Shift and press ENTER. To
clear everything and start over, highlight
CLEAR and press
ENTER. When you are satisfied with the name, highlight OK
and press ENTER.
Note: User-entered POI names can be up to 20 characters long (including spaces).
13c. If the Message field is selected: Use the keypad displayed, just as was described
in 13b, to enter a message for this POI.
13d. If the Vis (Visibility) field is selected: Press
ENTER. Select On or Off and Press
ENTER.
14. When the Icon, Name and Message fields are ready, use the
Arrow joystick to
highlight
Save.
15. Press
ENTER.
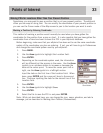
Points of Interest
38
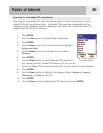
Editing an existing POI
with the Vis field
highlighted