


11
Section 2: Installation
Preparations
You can install the GPS system in some other order if you prefer, but
we recommend this installation sequence:
Caution:
You should read over this entire installation section before drill-
ing any holes in your vehicle or vessel!
1. Determine the approximate location for the GPS unit, so you can
plan how and where to route the power cable. This will help you make
sure you have enough cable length for the desired configuration.
NOTE:
The GPS antenna is inside the unit, so you must mount the unit in
a location with an unobstructed view of the sky.
2. Determine the location of your battery or other power connection,
along with the power cable route.
3. Install the power cable and route it to the GPS unit.
4. Mount the GPS unit.
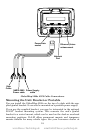
Power Connections
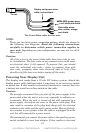
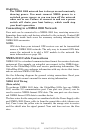
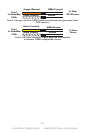
Your unit comes with a power/data cable that splits into three
branches, each with several exposed wires.
The thicker three-wire cable (white, red and black) is the power supply
for your display unit. This cable has no label.
The thinner branch with three wires (red, black and shield) is the
power cable for a NMEA 2000 network. It is labeled "NMEA 2000
POWER."
The branch with four wires (blue, yellow, orange, and shield) is a data
cable, labeled "RS-232 COMM." It supports a serial communication
port. This allows your unit to exchange NMEA 0183 data with another
device, such as an autopilot, DSC marine radio or computer.
www.Busse-Yachtshop.de email: info@busse-yachtshop.de