


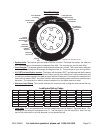


SKU 02948 For technical questions, please call 1-800-444-3353. Page 11
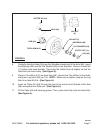
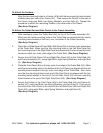
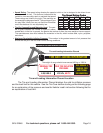
To Attach the Fenders:
Align the two mounting holes in a Fender (A16) with the two mounting holes located
midway along one side of the Frame (A1). Then secure the Fender to the side of
the Frame, using two Bolts, two Spring Washers, and two Nuts (6). Repeat this
procedure to attach the remaining Fender to the other side of the Frame.
(See Assy. Diagram.)
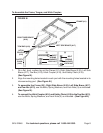
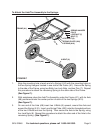
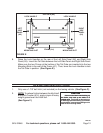
To Attach the Trailer Bed and Side Panels to the Frame Assembly:
With assistance, place the Trailer Bed (A4) on top of the Frame Assembly (A1).
Make sure all twelve mounting holes in the Trailer Bed are aligned with the twelve
mounting holes located on the front, rear, and sides of the Frame Assembly.
(See Assy. Diagram.)
Place the Left Side Panel (A2) and Right Side Panel (A3) on the top, outer, side edges
of the Trailer Bed. Make sure the four mounting holes in the Left Side Panel and
four mounting holes in the Right Side Panel are aligned with the four mounting holes
located on each top, outer, side edge of the Trailer Bed. (See Assy. Diagram.)
Secure the Left Side Panel (A2) and Right Side Panel (A3) to the Trailer Bed (A4)
and Frame Assembly (A1), using eight Bolts, eight Spring Washers, and eight Nuts
(3). (See Assy. Diagram.)
Place the Front Panel (A5) on the top, outer, front edge of the Trailer Bed (A4). Make
sure the two mounting holes in the bottom of the Front Panel are aligned with the two
mounting holes located in the top, outer, front edge of the Trailer Bed. Also, make
sure the four mounting holes in each end of the Front Panel are aligned with the four
mounting holes located in the end of the Left Side Panel (A2) and four mounting
holes located in the end of the Right Side Panel (A3). (See Assy. Diagram.)
Secure the bottom of the Front Panel (A5) to the Trailer Bed (A4) and Frame As-
sembly (A1), using two Bolts, two Spring Washers, and two Nuts (3). Then secure
the ends of the Front Panel to the ends of the Left Side Panel (A2) and Right Side
Panel (A3), using eight Bolts, eight Spring Washers, and eight Nuts (3).
(See Assy. Diagram.)
1.
2.
3.
4.
5.